
Welcome to the Abstract Documentation!
Abstract is an account-based application distribution and development platform. Our platform and tooling allow developers to build and scale their applications in a chain-abstracted manner.
This first part of our documentation aims to provide you with the conceptual knowledge you need to understand the Abstract platform. The second part is a step-by-step guide on how to use the Abstract SDK to build your decentralized applications.
Want a TL;DR? Read a high-level overview on the Abstract Platform.
Prefer video content? Check out our video library!
Who is Abstract For?
Chains
For chains, we offer chain abstraction and Abstract Accounts for effective user acquisition and engagement. Every chain with Abstract integrated has access to all apps developed with the Abstract SDK.
Protocols
For protocols, we offer on-chain application infrastructure for single + multi-chain application development and lifecycle management. We also maintain DeFi adapters for Dexes, lending markets, and staking providers.
App Developers
For app developers, we offer the Abstract SDK, the leading CosmWasm framework designed for organizations and individual developers who want to build composable distributed applications in a fast, secure, and cost-effective manner.
We expect developers to be familiar with the Rust programming language and general programming concepts.
Abstract Products
-
Abstract SDK: Modular CosmWasm framework for developing composable and scalable dapps agnostic to chains and protocols.
-
Application Infrastructure: On-chain infrastructure for application management.
-
Abstract Accounts: Modular smart-contract accounts.
-
Abstract Interchain: Interchain infrastructure and smart-contract abstractions for building multi-chain applications easily.
-
Abstract.js: TypeScript and React libraries for building full-stack Abstract dapps.
-
cw-orchestrator: The most advanced CosmWasm scripting, testing, and deployment tool, written fully in Rust.
Together these products form a complete end-to-end development platform for distributed applications.
How to Navigate the Docs
You can read the documentation in the order it is presented, or you can jump to the section that’s most relevant to you.
Help and Support
If you have any questions or ideas you want to discuss about our products, please contact us on Discord.
Want to make Abstract better?
Look at the Contributing & Community section if you want to get involved.
Links
Technologies
In this section, we’ll briefly introduce you to the tech-stack that Abstract depends on. We’ll do this from a top-down approach, starting with the smart-contract framework.
Already familiar with the stack? Jump to the next page to start learning about the Abstract SDK.
CosmWasm
The Abstract SDK and cw-orchestrator are tightly integrated with the CosmWasm smart-contract framework.
CosmWasm is a smart contract framework that is built on Rust and WebAssembly (WASM) to perform deterministic compute suitable for decentralized systems. It was born out of a desire to outgrow Solidity’s shortcomings.
It is the only smart contract platform for public blockchains that has seen heavy adoption and stress-testing outside of the EVM ecosystem.
To learn more about CosmWasm, check out its official documentation.
CosmWasm Coming from EVM
There are a few key differences between the EVM and CosmWasm that you should be aware of. The most important one is that instances of contracts and the code that they run against are two different concepts in CosmWasm. This means that you can have multiple instances of the same contract code running at the same time, each with their own state. This is not possible in EVM, where the contract code and the contract instance are the same thing.
This is an important difference to be aware of when we talk about migrations further in our documentation.
Migrations are a key feature of CosmWasm. They allow you to upgrade a contract’s code while retaining the state of the contract.
A migration doesn’t delete the code that was previously running for a contract. Code (a WebAssembly binary) is referred to by code-ids and contracts run against a specific code-id and get their own address space (and state) when they are instantiated. Hence migrations just update the code-id that a contract uses to run. I.e. The contract keeps its address and state but now runs on a different code-id (binary).
If you’re looking for a more in-depth comparison go read this article by the creator of CosmWasm.
Rust
Diving one level deeper, we have the Rust programming language. While theoretically any language can be compiled to WebAssembly, Rust is the only language that is officially supported. This is because Rust is a systems programming language that is designed to be fast and extremely safe.
Learn more about Rust here, or learn by doing the rustlings.
Typescript
You need to have a basic understanding of Typescript to use our front-end library.
You can learn about Javascript here.
Account Abstraction
Abstract uses Account Abstraction as a conceptual framework for building smart-contract applications. Our central idea is that, instead of building a monolithic smart-contract that users interact with, you let the smart-contract interact with a user-owned smart-contract wallet instead. Let’s dive a bit deeper into this concept and how it applies to Abstract’s own Abstract Accounts.
What is Account Abstraction?
In traditional blockchain interactions, a transaction is typically initiated by a user signing some data with their private key and transmitting that data (and its signature) to an endpoint for validation. Account abstraction modifies this process by making the transaction initiation and validation programmable. Essentially, it allows the transaction logic to be customized within a smart-contract, vastly extending the scope of UX possibilities.
The Abstract SDK provides what we call an Abstract Account, an extensible smart-contract wallet capable of holding tokens and interacting with other smart contracts. The ownership structure of an Abstract Account is customizable to fit your use-case.
flowchart
    subgraph Account Abstraction
    User2[fa:fa-user User] -- owns --> AA["Abstract Account (holds funds)"]
    direction TB
    Application2[Application] == interacts ==> AA
    end

    subgraph Traditional
    User[fa:fa-user Wallet] == funds ==> Application
    end
As displayed in the figure above, the Abstract Account (AA) is a smart contract wallet that is owned by the user. User action validation on the account is currently still performed through regular transaction authorization (wallet-based) but can be customized in the future to allow for OAuth login or other types of login methods.
The purpose of the Account is to hold funds for the user. Now if the user wants to interact with an application, they give the application permission to interact with the Abstract Account, and its funds. This way the user never gives the application custody over his/her funds.
See EIP-4337 to read about account abstraction in the Ethereum ecosystem.
In the next section we’ll dig into the architecture of Abstract Accounts.
Chain Abstraction
We believe that abstraction is key to adoption because users care about the experience, not the technology. Abstract enables chain abstraction for chains, protocols, and applications.
What is Chain Abstraction?
Watch our talk on chain abstraction to hear how Abstract solves the fragmentation presented by the appchain thesis.
The number of chains has been increasing exponentially year-by-year as blockchain technology evolves. While this offers more capabilities to application developers, it also makes the user experience significantly more fragmented as their accounts, liquidity, and applications are spread across multiple chains.
Put simply, chain abstraction removes the need to be aware of the active chain when interacting with an application. It “abstracts” the chain away, allowing the user to focus on the application in use.
Abstract chain abstraction
Abstract enables chain abstraction via Interchain Abstract Accounts (ICAAs). These ICAAs allow accounts on one chain to control accounts on any other chain connected via IBC via Abstract’s proprietary IBC protocol.
Experience chain abstraction yourself by minting an NFT on Neutron directly from XION here! This demonstration walks you through each step of the process, though all actions can be fully abstracted away in practice.
For Chains
Chains using Abstract can offer users access to apps, accounts, and yield opportunities on any chain connected via IBC. To deliver maximum value to your users, your chain must support the CosmWasm VM to be used as an Abstract controller chain If your chain is already IBC-enabled, it is Abstract-enabled and available to Abstract controller chains.
Benefits
- Interoperability with the interchain ecosystem
- Cross-chain yield availability
- Increased Total Value Controlled (TVC) by your chain
- Increased transaction volume
- Better cross-chain user experience
flowchart TB

  X((Chain))
  X ~~~ A

  subgraph A[Abstract IBC]
    Cosmos{{Cosmos}}
    C{{Celestia}}
    L{{Landslide}}
    U{{Union*}}
    P{{Polymer**}}
    Co{{Composable**}}
  end

  X -.- Cosmos
  Cosmos -.-> Cosmos2[Cosmos]
  X -.- L -.-> Avalanche
  X -.-> C -.-> R[Sovereign Rollups]
  X -.- U -.-> Ethereum
  X -.- P -.-> L2s
  X -.- Co -.-> Solana
  Co -.-> Polkadot
For Protocols
ICAAs give protocols cross-chain superpowers. Common use cases include:
Cross-chain Outposts
Outposts give users on other chains access to your application without having to transact on your application’s home chain. This extends the reach of your app and offers smoother UX.
flowchart LR

  subgraph Solana
    O3[Outpost]
  end

  subgraph Osmosis
    O4[Outpost]
  end

  subgraph Home
    App
  end

  subgraph Neutron
    O[Outpost]
  end

  subgraph Ethereum
    O2[Outpost]
  end

  App <-.-> O
  App <-.-> O2
  O3 <-.-> App
  O4 <-.-> App
Cross-chain DeFi Strategies
Complex DeFi strategies can be written using a combination of ICAAs and Abstract DeFi Adapters. For example, borrowing an asset on Kujira GHOST, and lending it on Neutron Mars to capture yield.
For Users
Any user with an Abstract Account is able to leverage our chain abstraction capabilities on Abstract-enabled chains. When a user makes a transaction using Abstract, technical aspects such as gas, bridging, and cross-chain interactions are performed behind the scenes, making their experience as smooth as possible.
Performance
ICAAs offer significantly higher performance and transaction throughput than the Interchain Account IBC Standard. In a case study with XION, we saw over a 10x increase in account creation and transaction bandwidth. With this being said, we also support traditional ICAs within our platform, though this is currently in an alpha stage. Please contact us to learn more.
Abstract Accounts
Abstract Accounts are programmable smart-contract wallets used as the backbone for Abstract Apps, which will be covered later. Abstract Accounts hold funds for users and/or applications while exposing a set of programmable endpoints that can be used to configure and interact with the account.
Abstract Apps use the Abstract Account on which they are installed as the settlement layer for their transactions. In other words, Abstract Apps rarely hold funds themselves. Instead they control the funds of the Account that they are installed on. This separation of concerns allows for a more secure and modular design.
In the upcoming sections, we will delve deeper into the architecture of Abstract Accounts, providing insights into its design principles and components.
Architecture
Abstract’s infrastructure provides users with the ability to create a sovereign smart-contract wallet. We call this smart-contract wallet
an Abstract Account.
flowchart LR
    Owner -."owns".-> Account
As shown in the image above, an owner of an account, can configure his Abstract Account by sending messages to the contract. We don’t make any assumptions about the nature of this owner, it can be a wallet, multi-sig or any other ownership structure, allowing you to customize your ownership structure to fit your needs.
You can read up on the different ownership structures that we explicitly support in our Ownership section.
The account’s architecture centers around configurable programmability. In other words, how can one configure the account (install applications, set permissions, etc.) to enable users and developers to easily customize it to do what they want?
To do this the account needs the following components:
-
Authentication 🔐: Authenticating privileged calls and ensuring only approved entities can interact with the account.
-
Application Management 📦: Managing and storing information about the applications installed on the account, their inter-dependencies, permissions and configurations.
-
Account Details 📄: Storing the account’s details, such as its name, description, and other relevant information.
-
Asset Management 💰: Holding the account’s assets, including tokens, NFTs, and other fungible and non-fungible assets.
-
Transaction Forwarding (Proxying) 🔀: Executing approved transactions from the owner or other smart-contracts.
Example Interactions
Perform an action on Your Abstract Account
The diagram below depicts an Owner interacting with his Abstract Account and proxying a call to an external contract.
sequenceDiagram
    actor Owner
    participant Account
    participant External Contract


    Owner ->> Account: Account Action
    Account ->> External Contract: Execute
Enabling IBC on Your Abstract Account
Enabling the IBC functionality on your Abstract Account is done via the UpdateSettings message. By doing so the IBC client will be registered to your account, enabling your modules to execute cross-chain commands.
sequenceDiagram
    autonumber
    actor U as Owner
    participant M as Account
    participant REG as Registry

    U ->> M: UpdateSettings
    Note right of U: ibc_enabled
    M -->>+ REG: Query IBC Client address
    REG -->>- M: Return IBC Client address
    M ->> M: Register IBC Client
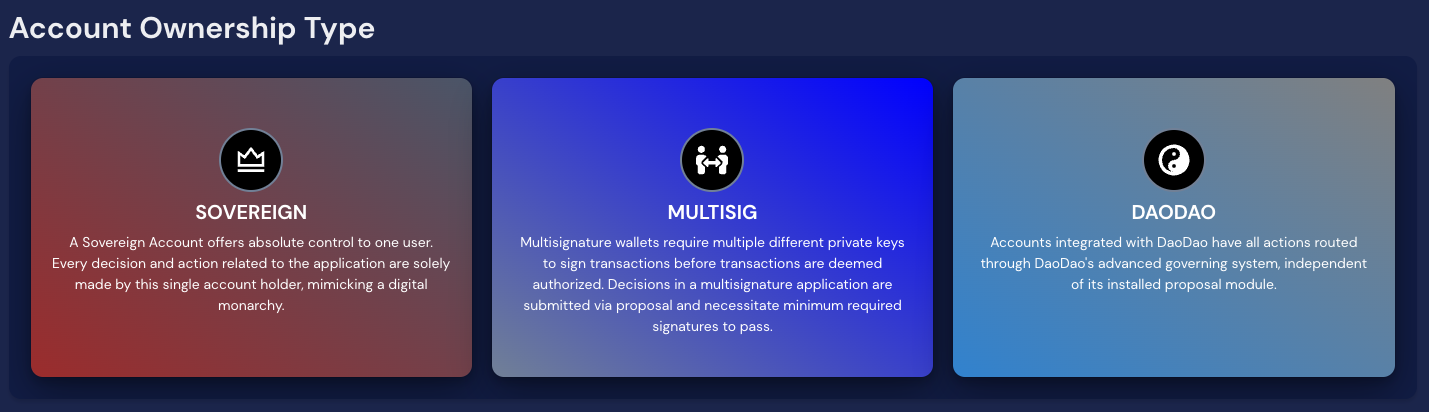
Account Ownership
Abstract Accounts can be owned by any (custom) governance infrastructure. Because most developers appreciate an easy-to-use interface to control their Account, Abstract supports two fully integrated governance structures that ensure a seamless user experience.
When configuring the governance for your Account, you will be prompted to choose between supported governance types, Monarchy or Multi-signature.
Not interested in account ownership? Skip to our section on Framework Components.
Monarchy
In a monarchy, a single wallet has full control over the Account. If you’re connected with a wallet, your address will be automatically inserted as the owner.
graph TD
    A[Single Account] -->|Controls| B(Abstract Account)
Multi-signature
Multi-signature (“multisig”) governance is a governance structure that requires a subset of its members to approve an action before it can be executed. Abstract implemented this functionality with the cw-3 standard.
Here are a few terms you need to know about when configuring your multisig:
- Voter weight 🏋️♂️: The weight that the voter has when voting on a proposal.
- Threshold 📊: The minimal % of the total weight that needs to vote YES on a proposal for it to pass.
graph TD
    subgraph Voters
        V1[Voter 1]
        V2[Voter 2]
        V3[Voter 3]
    end

    V1 --> A[Multisig Wallet]
    V2 --> A
    V3 --> A

    A -->|Controls| B(Abstract Account)

    B[Abstract Account]
Example
Suppose you share an account with your friends and want to use a multisig governance structure to prevent unilateral control over the account. You have five stakeholders, and you want at least 60% of the total voting weight to approve a proposal for it to pass.
- Set up the multisig module in your dApp.
- Assign voter weights to each of the five stakeholders. For instance, A: 30%, B: 20%, C: 20%, D: 15%, and E: 15%.
- Configure the multisig module with a 60% threshold.
With this configuration, any proposal will require approval from stakeholders with a combined voting weight of at least 60% to be executed. This ensures a more democratic decision-making process and reduces the risk of a single stakeholder making unilateral decisions.
NFT
NFT governance is a structure that represents an account which ownership depends on the ownership of an NFT. This admin of the Account is the owner of the specific token. When this token is transfered, the account ownership is transferred automatically with it.
graph TD
    subgraph NFT
        A[Single Account] --> |Owns| T1[Token1]
    end
     A-->|Controls| C(Abstract Account Linked to Token1)
Xion Abstract Account
This XION Abstract Account governance leverages Xion’s techonology to authenticate user calls using other methods than the standard Wallet/Private/Public Key authentication. With this governance type, users are able to extend the XION base functionalities to work directly with Abstract.
You can find more details on the Xion Abstract Account page.
graph TD
    subgraph NFT
        A[Single Account] --> |Owns| T1[Token1]
    end
     A-->|Controls| C(Abstract Account Linked to Token1)
Sub-Accounts
A Sub-Account is an Abstract Account that is owned by another Abstract Account. They are important to users as they allow users to safely experiment with different apps without the concern of those apps accessing funds from their main account or other apps.
Sub-accounts are easily created by calling CreateSubAccount on any account. The diagram below shows how sub-accounts are owned by a main Account or other sub-accounts.
flowchart TB
    Account
    SubAccount-A
    SubAccount-B
    SubAccount-C
    Owner --> Account
    Account --> SubAccount-A
    Account --> SubAccount-B
    SubAccount-A --> SubAccount-C
To simplify accessing or configuring a sub-account or app we allow calling any sub-account or any app on a sub-account directly without requiring the message to be proxied through the top-level account. The diagram below shows how an account owner can configure the sub-accounts and apps directly that are part of his main account.
flowchart TB
    %% Define the Owner and the main Account
    Owner -- owns --> Account

    %% Sub-Accounts hierarchy
    Account -- owns --> SubAccountA[Sub-Account A]
    Account -- owns --> SubAccountB[Sub-Account B]
    SubAccountA -- owns --> SubAccountC[Sub-Account C]

    %% Apps associated with Sub-Accounts
    SubAccountA -- installed --> AppA[App A]
    SubAccountC -- installed --> AppC[App C]

    %% Owner can configure Sub-Accounts and Apps directly
    Owner -. configures .-> SubAccountA
    Owner -. configures .-> SubAccountB
    Owner -. configures .-> SubAccountC
    Owner -. configures .-> AppA
    Owner -. configures .-> AppC
This diagram illustrates:
- The Owner owns the main Account.
- The Account owns Sub-Account A and Sub-Account B.
- Sub-Account A owns Sub-Account C.
- Sub-Account A installed App A, and Sub-Account C installed App C.
- The Owner can directly configure any Sub-Account or App without needing to proxy through the main Account.
Explanation of the Diagram:
- Ownership Relationships: Solid arrows (
-- owns -->) indicate ownership. The hierarchy shows how sub-accounts are nested and owned by parent accounts. - App Associations: Solid arrows labeled
installedshow which apps are associated with which sub-accounts. - Direct Configuration: Dashed arrows (
-. configures .->) indicate that the owner can directly configure the sub-accounts and any of its apps.
As a result of this structure, complex multi-account systems can easily be transferred between governance systems by simply changing the owner of the top-level account.
Sub-accounts have a depth of 2. I.e. an account can have sub-accounts, and those sub-accounts can have sub-accounts themselves, but no further.
Interchain Abstract Accounts
The Cosmos is going interchain. The arrival of Inter-Blockchain Communication (IBC) launched us into a new paradigm in application development. New use-cases and solutions to existing UX problems are now possible. As the interchain application platform, Abstract attempts to make IBC accessible to developers and users alike. In this section we’ll delve into interchain application development, what makes it so hard, and how Abstract can help you create your first Interchain application.
What is The Interchain?
The Interchain, also known as the Internet of Blockchains, is a network of interconnected blockchains that interact through a shared protocol. This interaction is enabled by the Inter-Blockchain Communication (IBC) protocol, a communication standard akin to the TCP used amongst networked computers. IBC permits the transmission of any data variety between blockchains, allowing users to send data, such as tokens or messages, from one blockchain to another without relying on third-party trust. This innovation is a major breakthrough for the blockchain industry as it enables the formation of a blockchain network with independent communication capabilities, allowing for virtually infinite scale.
If you’re interested in a visual representation of the interchain, check out the map of zones.
Building on The Interchain
Developers quickly started developing applications with IBC after its release. But they quickly ran into a major
problem. IBC is not developer friendly. It’s a low-level protocol that requires extensive knowledge about its inner
workings. These problems were quickly recognized by the CosmWasm community. In response, DAO-DAO
built Polytone, an Interchain Account (ICA) solution for CosmWasm
smart-contracts. This was a great step forward for interchain CosmWasm development, but it introduced its own
complexities and knowledge requirements.
As a response, Abstract has created its own ICA solution called Interchain Abstract Account (ICAA). The goal of ICAA is multifold. First, it aims to make IBC accessible to developers by removing any knowledge requirements about the underlying technology. Using IBC is as simple as enabling it on an Abstract Account and interacting with it through our SDK. Second, it aims to make IBC a backend technology, unbeknown to users. Users should not have to know about IBC. They should only have to know about the application they are using.
Interchain Abstract Accounts (ICAA)
An Interchain Abstract Account is an Abstract Account that is owned by another Abstract Account which is located on a different chain. This relationship is showcased in the diagram below.
flowchart LR
    subgraph Juno
        direction BT
        Account
    end

    subgraph Osmosis
        direction BT
        Account -- Polytone --> ICAAOsmo[ICAA]
    end
direction TB
Owner[fa:fa-user Owner] ==> Account
When a user creates an Abstract Account they do so locally on whichever chain they prefer. In this scenario the user opted to create his account on the Juno network.
After account creation the user (or his application) opted to create an ICAA on Osmosis. The ICAA creation is handled by the ibc-host in a similar way to regular account creation. After successfully creating the ICAA, the user (and his/her applications) can interact with the ICAA as if it were a regular account. Applications can send tokens to the ICAA, execute smart-contract calls, request queries and more. With the help of Polytone, the ICAA returns the result of these actions to the application.
The account creation process is covered in detail in the Account Creation section.
ICAAs can be chained together, creating a network of accounts that can interact with each other. This allows for the creation of complex applications that span multiple chains. The diagram below showcases this relationship.
flowchart LR
    subgraph Juno
        direction BT
        Account([Account])
    end

    subgraph Osmosis
        direction LR
        Account --> ICAAOsmo([ICAA])
        ICAAOsmo2([ICAA 2])
    end

    subgraph Terra
        direction RL
        Account --> ICAATerra([ICAA])
    end

    subgraph Archway
        direction RL
        ICAATerra --> ICAAArch([ICAA])
        ICAAArch --> ICAAOsmo2
    end
    Owner[fa:fa-user Owner] ==> Account
Each of these accounts has a unique AccountId defined by the account’s origin chain and the path over which it was
created. This allows the account’s owner to decide how messages should be routed.
flowchart LR
    subgraph Juno
        direction BT
        Account([local-1])
    end

    subgraph Osmosis
        direction LR
        Account --> ICAAOsmo([juno-1])
        ICAAOsmo2([archway>terra>juno-1])
    end

    subgraph Terra
        direction RL
        Account --> ICAATerra([juno-1])
    end

    subgraph Archway
        direction RL
        ICAATerra --> ICAAArch([terra>juno-1])
        ICAAArch --> ICAAOsmo2
    end
direction TB
Owner[fa:fa-user Owner] ==> Account
Interchain Applications
We’re now able to easily create interchain applications. I.e. a single smart-contract that we can deploy to multiple blockchains that uses IBC to communicate about its state. Any chain-specific logic can be handled by the application’s dependencies, like the dex or staking adapter.
Need a refresher on adapters? Check out the Adapters section.
Modules
Modularity is a core design principle of the Abstract platform to allow for more maintainable and composable applications.
A module in Abstract is a smart-contract that can be installed on an Abstract Account to extend the account’s capabilities. Modules can be installed, removed, and configured by the account’s owner, allowing for a high degree of customization. Additionally, modules can take on dependencies on other modules and securely interact with each other.
Instead of building every part of an application from scratch, application developers can make use of an existing availability of pre-built logical components.
When you’re writing software, do you use libraries or do you write everything from scratch?
The obvious answer is that you use libraries. You use libraries because they save you time and effort, allowing you to focus on the core functionality of your application. You also use libraries because they’re tested and proven to work, reducing the risk of bugs and vulnerabilities.
Modules allow you to do the same thing, but with smart-contracts.
You can leverage modules either from Abstract’s extensive library or those crafted by other developers available in the module library. Most importantly any application on Abstract, including yours, is a module.
How Modules Work
As mentioned, a module’s functionality can be accessed by installing it on an Abstract Account. The process of installing a module involves calling the Abstract Account to perform its installation. An analogy to installing a module is pressing the “install” button for any app in the iOS/Android app store where the module is the App and the Abstract Account is the phone.
As described in a previous section, the Account keeps track of all installed modules and manages their permissions and interactions.
Through this system users can easily customize individual Abstract Accounts, permitting the installation or removal of modules according to their needs. In doing so, it effectively adapts the Account’s functionality.
From the perspective of a developer, the Abstract framework sets conventions and standards that allow leveraging existing modules during the development of new ones. It also provides a supply chain for smart-contract software, allowing developers to create and market their modules to users and other developers through our platform.
Security
Security is a top priority at Abstract. Every module listed on the mainnet marketplaces must undergo a thorough auditing process before it is made available to users and developers. This process scrutinizes the module’s code, checking for potential vulnerabilities, and ensuring that it adheres to best security practices. Additionally we are firm believers of open-source software and encourage developers to publish their code on GitHub.
While no system can guarantee absolute security, this rigorous vetting process, coupled with the inherent security benefits of Abstract’s and CosmWasm’s architecture, mitigates potential risks to a considerable extent.
The Abstract platform also maintains a Registry for all the modules, allowing developers to track changes, understand the evolution of a module, and choose versions that have passed security audits.
Module Types
As explained in the previous section, a module is a smart-contract that extends an Account’s functionality. You can explore all the available modules on the modules tab of your Account through the web-app.
Modules are classified in the following categories:
- App: Modules that add a functionality, exposing new entry-points for you or your users.
- Adapter: Modules that act as a standard interface between your Account and external services.
- Standalone: Modules that are not directly integrated with Abstract Accounts.
- Service: Reference to a smart-contract or module that is externally maintained.
Each module type has its own characteristics best fit for different use-cases. The main differences between the module types are:
- Customizability: The ability for the user of the application to customize important settings of the application.
- Permissions: The ability for the app to execute messages on behalf of the user’s account. “Admin” indicates that the app can execute messages on behalf of the account, while “Non-Admin” indicates that the app can’t.
quadrantChart
  x-axis Admin --> Non-Admin
  y-axis Static --> Customizable
  quadrant-1 Standalone
  quadrant-2 App
  quadrant-3 Adapter
  quadrant-4 "(App as) Service"
It’s noteworthy to mention that most, if not all blockchain applications currently fall under the “Service” category. This is because they are monolithic deployments, maintained by a single entity and not customizable by users. The concept of “Admin” apps also does not exist. Users delegate their funds to the applications they interact with instead of permissioning applications to interact with their funds.
Module IDs
Every module is uniquely identified by a module ID. This ID is a string that follows the following format:
<namespace>:<name>
The namespace is a string that resembles the publishing domain of a module developer, while the name is the name of the module itself. For example, the abstract:etf module is an App module developed by Abstract where abstract is the namespace and etf is the name of the module.
Additionally each module has a SEMVER version number that can be used to uniquely identify a specific version of a module, or just get the latest version. Module IDs and their versions are used to install modules on an Abstract Account.
A module ID is independent of the kind of module it refers to.
Apps
An App module adds or alters the functionality of an Abstract Account, exposing new functions to you and/or your users. This could range from adding advanced financial logic to data management features or permission systems, depending on your use-case.
Each App module instance is exclusive to a single Abstract Account, meaning the instance is created and owned by the Account, ensuring the owner has full control over the module’s functionality and lifecycle. This level of control extends to the management of upgrades, maintenance, and any customization that might be required for the specific use case of the application.
The fact that users are in complete control over their applications is a feature that powers MyFi. A paradigm that we introduced in this article.
Because each Account has its own instance of an App, App modules can be tightly integrated with the Account’s existing infrastructure. This includes the ability to interact directly with other modules (including Apps) installed on the same account, enabling powerful synergies and cross-module functionality.
The abstract:etf module is an app that allows external users to buy and sell “shares” in your Account, representing a portion of the Accounts’ value.
Adapters
Adapters serve as standard interfaces that facilitate communication between your Abstract Account and various external services. They act like bridges, enabling your account to interact with different smart contracts and blockchain services, thereby enhancing the interoperability of your applications.
The key function of an Adapter is to generalize functionality. Regardless of the underlying blockchain or smart contract protocol, the Adapter provides a standard interface that maintains consistency and simplifies the interaction process. As such, Adapters significantly simplify the developer experience and reduce the time required to integrate with various external systems.
Unlike other modules specific to each Abstract Account, Adapters are “global” in nature. This means that they are shared between multiple accounts. Due to this, Adapter modules are not migratable. This design choice is aimed at preventing supply-chain attacks that could potentially compromise the security of the Abstract ecosystem.
While individual Abstract Account owners can decide which Adapters and versions they wish to utilize, the overall control and maintenance of Adapters are handled at a platform level. This approach ensures that Adapters remain reliable, secure, and consistent across all Accounts.
The abstract:dex module allows Accounts to access standard functions on dexes with the same interface, regardless of whether they’re local to the chain or across IBC.
flowchart LR
    subgraph Accounts
        direction BT
        subgraph Acc1["Account 1"]
            App1["abstract:etf"]
        end
        subgraph Acc2["Account 2"]
            App2["abstract:etf"]
        end
    end

    subgraph Adapters
        Acc1 --> Adapter1{{"abstract:dex"}}
        Acc2 --> Adapter1
    end

    Adapter1 --> dex1([Osmosis])
    Adapter1 --> dex2([Wyndex])
    Adapter1 --> dex3([Astroport])
abstract:etf app module installed, using the abstract:dex adapter to interact with multiple dexesStandalone
A Standalone module is any contract that is not directly integrated with Abstract Accounts. These contracts don’t have to conform to the expected APIs of other module types. Examples include cw20 tokens, vesting contracts, etc. Having control over the contract’s API is especially useful if you require your contract to accept an externally defined ExecuteMsg variant.
On installation the standalone contract will be instantiated and the Account will be configured as the owner of the contract. The standalone contract will be stored as an installed module on the account. Developers that want to access the on-chain Abstract infrastructure can initialize a Standalone struct in their contract and use it to access different APIs provided by the SDK.
Standalone contracts, unlike Adapters and Apps, can’t execute messages on the account. They are highly suited for module-to-module IBC applications.
You can find an example standalone application here.
Service
A Service module is not a module type per se, but rather a way to categorize a smart-contract that provide a service to the Abstract ecosystem. The contract could be an app module installed on an account of the service provider, or a contract that is not directly integrated with Abstract Accounts.
Regardless, services are most useful when creating an on-chain service for other accounts or EOAs. For example, an on-chain mail service should be referenced by others but its developers should also be able to upgrade it. If the developers build the application with Abstract they can publish the module as an App, instantiate or migrate it on their account and then register it as a Service for others to reference.
Module Upgradability
Smart-contract migrations are a highly-debated feature in smart-contract development. Nonetheless Abstract believes it to be a powerful feature that allows for fast product iteration and bug-fixing. In the spirit of crypto we’ve designed a system that allows for permissionless software upgrades while maintaining trustlessness.
If this is the first time you hear about smart-contract migrations, we recommend you to read the CosmWasm documentation on the topic.
Module Version Registry
Upgrading a module is facilitated by the module version registry in the registry contract. The mapping allows your Account to:
- Instantiate a module of the latest versions.
- Upgrade a module to a new version.
- Provide custom modules to other developers.
- Do all this without losing sovereignty.
There are two types of possible upgrade paths, although they appear the same to you as a developer.
Migration Upgrade
Most module updates will perform a contract migration. The migration can be evoked by the owner and is executed by the account. Migrations apply to the App and Standalone module types.
Move Upgrade
Adapter modules can not undergo any migrations. Therefore, each Adapter version is instantiated on a different address.
When a user decides to upgrade an Adapter module, the abstract infrastructure moves that user’s configuration on that Adapter to the new Adapter and removes the permissions of the old Adapter.
However, any modules that depend on the upgraded Adapter module don’t have to update any of their state as a module’s address is resolved dynamically through the account contract, similar to how DNS works!
Module Upgrade Flow
You can skip this section if you're not interested in the technical details of how module upgrades work.
Abstract manages the state-management related to module upgrades for you, ensuring your infrastructure remains intact and your applications continue to function smoothly through every upgrade.
Upgrades are carried out in a manner that consistently maintains the integrity and security of your system. I.e. we programmed the system to disallow any upgrade actions that would break your system’s version requirements.
The process for upgrading modules is shown in the following diagram:
sequenceDiagram
    autonumber
    actor U as Owner
    participant A as Account
    participant REG as Registry
    U ->> A: Upgrade
    loop for each module
        A -->> REG: Query reference
        alt adapter
            REG -->> A: Return address
            A ->> A: Update module address and whitelist
        else app / standalone
            REG -->> A: Return code_id
            A ->> A: Migrate module to new code_id
        end
    end

    opt
        A -> A: Migrate self
    end
    A -> A: Update dependencies
    A --> A: Check dependencies
An important aspect of this process is how the integrity of the modules is ensured.
Proposed module upgrades are performed sequentially and atomically while keeping track of all changes. As the last step in the upgrade flow a collection of version requirements and dependency checks are performed to ensure that module’s dependencies are present and version-compatible.
Monetization
Our app-store provides developers with the ability to monetize their modules by configuring an installation fee for their modules. By introducing monetization strategies, Abstract offers developers incentives to build and share valuable modules with the community.
Here’s a concise breakdown of how this works:
- As explained, modules are the building blocks of Abstract Apps and can be installed on Abstract Accounts.
- Modules can be developed and published to the Abstract App Store by any developer.
- Each module can be configured with a Monetization strategy, primarily:
- InstallFee: A fee set by the developer which must be paid by other users to install the module. This fee is then transferred to the namespace owner’s account, which is fetched from the registry registry.
- None: No monetization strategy is applied for the module.
All module monetization details are stored in the registry but are verified and enforced by the module factory.
To assist users in budgeting, the module factory provides the SimulateInstallModules query, which returns the total
sum of funds required to install a specified set of modules, including monetization and initialization funds.
Subscriptions
In addition to one-time installation fees, the Abstract framework empowers developers to introduce subscription-based monetization strategies for their modules. This model facilitates a steady stream of revenue, enhancing the sustainability and continuous development of the modules.
Subscriptions are being worked on and will be available soon, stay tuned!.
Abstract Infrastructure
At this point you have enough knowledge to start building your own Abstract Module. If you want to start building, head over to our Getting Started section! 🛠️
In the previous sections, we covered different high-level aspects of the Abstract framework. In the following sections, we will outline the different contracts of the Abstract infrastructure in more detail.
On-Chain Contracts
-
Module Factory: Facilitates installing Abstract Modules on an Account.
-
Abstract Name Service (ANS): A name service that enables chain-agnostic action execution by storing commonly retrieved data such as assets, contracts, and IBC channels.
-
Registry: A registry for modules and accounts. It exposes namespace claiming, module registrations, and detailed querying of modules by namespace, name, and version.
Features
Through the interplay of the components above, Abstract offers a number of features that make it a powerful framework for sustainable application development.
- Monetization: Developers have the ability to monetize their modules by setting installation fee or usage fees for their modules. By providing direct monetization strategies we aim to reduce funding intermediaries and improved the sustainability of small team/solo developer projects.
Account Creation
As was covered in the section on Account Architecture an Account is just a single smart-contract that can act as a wallet. This means that creating an Account is as simple as instantiating a smart-contract.
Account Parameters
Accounts are created by instantiating an Account contract that has been registered with the registry contract. The registry contract is a contract that keeps track of all the modules and account code-ids and addresses on the Abstract platform.
The Account contract takes the following parameters:
pub struct InstantiateMsg<Authenticator = Empty> {
    /// Code id of the account
    pub code_id: u64,
    /// The ownership structure of the Account.
    pub owner: GovernanceDetails<String>,
    /// Optionally specify an account-id for this account.
    /// If provided must be between (u32::MAX/2)..u32::MAX range.
    pub account_id: Option<AccountId>,
    /// Optional authenticator for use with the `abstractaccount` cosmos-sdk module.
    pub authenticator: Option<Authenticator>,
    /// Optionally claim a namespace on instantiation.
    /// Any fees will be deducted from the account and should be provided on instantiation.
    pub namespace: Option<String>,
    /// Optionally install modules on instantiation.
    /// Any fees will be deducted from the account and should be provided on instantiation.
    #[serde(default)]
    pub install_modules: Vec<ModuleInstallConfig>,
    /// Optional account name.
    pub name: Option<String>,
    /// Optional account description.
    pub description: Option<String>,
    /// Optional account link.
    pub link: Option<String>,
}
The account can be instantiated using the normal instantiate function or instantiate2, which allows you to claim deterministic addresses.
During the instantiation process the account will self-register on the registry contract, making it queryable by its account-id.
Abstract Name Service
The Abstract Name Service (or ANS in short) is an on-chain data store of the most important address space related data of the blockchain it is deployed on. It allows for chain-agnostic action execution and dynamic address resolution. These features enable both users and developers to engage with the blockchain in a more intuitive manner.
ANS Architecture
The ANS is a smart contract that stores the following data:
- Assets: The most relevant assets on the local blockchain.
- Contracts: Contracts related to certain protocols or applications that could be dynamically resolved. This could be used to store the address for an asset-pair for a dex. For example, “osmosis/juno,osmo” could be resolved to the address of the osmosis pool that allows you to swap osmo for juno.
- Channels: IBC channel data to map a protocol + destination chain to a channel id. This allows for dynamic IBC transfers without having to know the channel id beforehand.
The ANS contract state layout is defined here. It consists of key-value mappings for the different entries.
#![allow(unused)]
fn main() {
    /// Stores name and address of tokens and pairs
    /// LP token pairs are stored alphabetically
    pub const ASSET_ADDRESSES: Map<&AssetEntry, AssetInfo> =
        Map::new(storage_namespaces::ans_host::ASSET_ADDRESSES);
    pub const REV_ASSET_ADDRESSES: Map<&AssetInfo, AssetEntry> =
        Map::new(storage_namespaces::ans_host::REV_ASSET_ADDRESSES);

    /// Stores contract addresses
    pub const CONTRACT_ADDRESSES: Map<&ContractEntry, Addr> =
        Map::new(storage_namespaces::ans_host::CONTRACT_ADDRESSES);

    /// stores channel-ids
    pub const CHANNELS: Map<&ChannelEntry, String> =
        Map::new(storage_namespaces::ans_host::CHANNELS);

    /// Stores the registered dex names
    pub const REGISTERED_DEXES: Item<Vec<DexName>> =
        Item::new(storage_namespaces::ans_host::REGISTERED_DEXES);

    /// Stores the asset pairing entries to their pool ids
    /// (asset1, asset2, dex_name) -> {id: uniqueId, pool_id: poolId}
    pub const ASSET_PAIRINGS: Map<&DexAssetPairing, Vec<PoolReference>> =
        Map::new(storage_namespaces::ans_host::ASSET_PAIRINGS);

    /// Stores the metadata for the pools using the unique pool id as the key
    pub const POOL_METADATA: Map<UniquePoolId, PoolMetadata> =
        Map::new(storage_namespaces::ans_host::POOL_METADATA);
}
You can find the full source code for the ANS contract here.
Resolving Entries
The information provided by the ANS is great to have. However, directly calling CosmWasm smart queries on the ANS contract can make your code messy and significantly raise gas usage. For this reason, we offer three methods to efficiently and dependably execute low-gas queries on the ANS contract.
Resolving your asset/contract name to its matching value is much like resolving a domain name like
abstract.moneyto its IP address (172.67.163.181).
There are three ways to resolve your entry into its matching value.
AbstractNameService Trait (Recommended)
Both App and Adapter objects implement the AbstractNameService trait which allows you to resolve entries.
let juno_name = AssetEntry::new("juno");
let juno_asset_info = my_app.name_service(deps).query(&juno_name)?;
Resolve Trait
Entries that are resolvable by the Abstract Name Service implement the Resolve trait which gives them the ability to
be resolved by ANS explicitly.
let ans_host = my_app.ans_host(deps)?;
let juno_name = AssetEntry::new("juno");
let juno_asset_info = juno_name.resolve(&deps.querier, &ans_host)?;
AnsHost Object
You can also load or create an AnsHost struct. This struct is a simple wrapper around an Addr and implements methods
that perform raw queries on the wrapped address.
let ans_host = AnsHost {address: "juno1...."};
let juno_name = AssetEntry::new("juno");
let juno_asset_info = ans_host.query_asset(deps, &juno_name)?;
Registry
The Registry contract acts as the registry for all modules and accounts within the Abstract platform. Abstract Accounts can use it to claim namespaces and register their modules. The Registry contract allows modules to be queried by its namespace, name, and version, returning its reference which may be a code id or address.
Namespaces
An account’s namespace is a unique identifier that is used to provide a publishing domain for modules and a human readable name for any Abstract Account.
Namespaces are claimed by an account and can be used to publish modules. Namespaces are unique and can only be claimed once. An account can only claim one namespace.
When a namespace is removed from an account, any modules published under that namespace will be removed from the registry. This is to prevent malicious actors from registering modules under trusted namespaces.
Propose Modules
Developers that wish to publish modules to the Abstract platform need to call ProposeModules on the Registry contract. The modules will subsequently be reviewed by the Abstract platform for registration.
For documentation on how to register modules, see Module Deployment
Modules cannot be registered without their namespaces being claimed by an Account. This is to prevent malicious actors from registering modules under trusted namespaces.
Below details the assertion process.
sequenceDiagram
    autonumber
    actor U as Owner

    participant REG as Registry
    participant Acc as Account of Namespace
    participant M as Adapter Instance

    U ->> REG: ProposeModules

    loop

        REG --> REG: Load Account ID for namespace
        REG --> REG: Load Account Account address
        REG -->>+ Acc: Query Account owner
        Acc -->>- REG: Address

        opt adapter
            REG -->> M: Assert no sudo admin
            activate M
            REG -->> M: Assert same cw2 data
            deactivate M
        end

    end
    REG ->> REG: Save modules
For mainnet deployment proposed modules are reviewed by the Abstract team. To get them approved, reach out to us on Discord. For testnet deployment there is no review process.
Module Factory
The Module Factory is a contract that allows Account owners to install and manage Abstract Modules for their Account. You can install modules by interacting with the Account directly, i.e. via CLI, or by using the Account Console.
To recap from that chapter, there are three types of modules: App, Adapter, and Standalone.
Flow Diagrams
Install Module
When a developer requests the installation of a module, the following internal process is initiated:
sequenceDiagram
    autonumber
    actor U as Owner
    participant A as Account
    participant MF as Module Factory
    participant REG as Registry

    U ->> A: InstallModule
    A ->> MF: InstallModule
    MF -->>+ REG: Query reference
    alt adapter
        REG -->>+ MF: Return address
    else app / standalone
        REG -->>- MF: Return code_id
        MF -> MF: Instantiate module
    end
    MF ->> A: Register module address

    A ->> A: Update module allowlist
Execute on Module
Once the module is installed, there are essentially three ways to interact with it depending on the type of module:
Owner Execution
The owner of an Account can always execute on the module directly, even if the module is installed on a sub-account.
sequenceDiagram
    autonumber
    actor U as Owner
    participant Md as Module ("addr123")
    Note right of U: ModuleMsg

    U ->> Md: Execute
Adapter Execution
In the following example, the abstract:dex module is installed on an Account and the user requests a swap on a dex. This swap will use the funds held in the Account to execute the swap on the target dex.
sequenceDiagram
    autonumber
    actor U as Owner
    participant D as abstract:dex
    participant A as ANS
    participant A as Account
    participant T as Dex Pool
    Note right of U: Dex::Swap {account: "juno1xd..."}
    U ->> D: Call module
    D -->>+ A: Resolve asset names
    A -->> D: Asset infos
    D --> A: Resolve dex pool
    A -->>- D: Pool metadata
    D --> D: Build swap msg for target dex
    D ->> A: Forward execution
    Note over D, A: DexMsg
    A ->> T: Execute
    Note right of A: DexMsg
App Execution w/ Dependencies
In this example, we use Equilibrium’s Rebalance permissionless function as an example. Modules with
dependencies (equilibrium:balancer is dependent on abstract:etf and abstract:dex) have their addresses dynamically
resolved when called.
sequenceDiagram
    autonumber
    actor U as User
    participant B as equilibrium:balancer
    participant A as Account
    participant D as abstract:dex
    participant T as Target Dex

    U ->> B: Rebalance
    B -->>+ A: Query Allocations (Oracle)
    A -->>- B: Allocations
    B --> B: Calculate rebalancing requirements

    B -->>+ A: Query abstract:dex address
    A -->>- B: Address

    B ->> D: Call SwapRouter on dex
    D --> D: Build swap msg for target dex
    D --> D: Load account address

    D ->> A: Forward execution
    Note over A: DexMsg
    A ->> T: Execute
    Note over D, A: DexMsg
Module Flows
Module instantiation and execution is a process that is somewhat hidden from the end-user and developer. This section aims to elaborate on the message execution flows for these actions.
Installing and Uninstalling Modules
The following are sequence diagrams of the process of installing and uninstalling a module on an Abstract Account. As you can see, the process happens via the Account, and it can be done by the Account owner through the web-app.
sequenceDiagram
    autonumber
    actor U as Owner
    participant A as Account
    participant MF as Module Factory
    participant REG as Registry
    U ->> A: InstallModule
    A ->> MF: InstallModule
    MF -->>+ REG: Query Module Details
    alt adapter
        REG -->>+ MF: Return address
    else app / standalone
        REG -->>- MF: Return code_id
        MF -> MF: Instantiate module
    end
    MF ->> A: Register module address
    A ->> A: Update module allowlist
At this point you should be able to understand the message flow depicted above. Just to be sure, we’ll briefly outline the process’s steps.
Installing a module starts by the Owner of the Account requesting the installation of the module. The request contains the module ID(s) and possible instantiate messages for any App/Standalone modules that should be installed (aka instantiated).
The Account contract verifies the request and forwards it to the Module Factory. The Module Factory then queries the Registry (the on-chain module registry) for the module details. These module details contain both the version of the module as well as its type-specific data. This type-specific data is depicted by the two alternatives (alt) of the returned query.
Either the query returns an Adapter’s address (which is already instantiated) or it returns an App/Standalone code-id. This code-id is then used by the Module Factory to instantiate an instance of that module.
After instantiating the modules, the Account registers the modules internally and updates its whitelist. This whitelisting provides the modules with the ability to proxy message execution through the Account.
sequenceDiagram
    autonumber
    actor U as Owner
    participant A as Account
    U ->> A: UninstallModule
    A -> A: Deregister module
    A ->> A: Update Account Whitelist
Uninstalling a Module follows a similar execution flow as shown above.
In both flows we omitted the dependency-check logic, which will be discussed in more detail later.
Example Execution Flows
The following are sequence diagrams of the process of executing a function on a module of an Abstract Account. We show three examples of executing a module: Owner Execution, Adapter Execution, and Dependency Execution.
Let’s explore each of them.
Owner Execution
To execute a (permissioned) message on a specific module, the Owner can call the module directly. The Module knows who the Owner of the Account is.
sequenceDiagram
    autonumber
    actor U as Owner
    participant Md as Module ("addr123")
    U ->> Md: Execute
Adapter Execution
In the following example, the abstract:dex adapter is installed on an Account, and the Owner requests a swap on a dex. By providing the address of the Account in the call, the adapter can assert that the caller is the Owner of the Account.
sequenceDiagram
    autonumber
    actor U as Owner
    participant D as abstract:dex
    participant REG as Registry
    participant A as ANS
    participant A as Account
    participant T as Dex Pool
    Note right of U: Dex::Swap {account: "juno1xd..."}
    U ->> D: Call module
    D -->+ REG: Load address for Account
    REG -->- D: Address
    D -->>+ A: Resolve asset names
    A -->> D: Asset infos
    D --> A: Resolve dex pool
    A -->>- D: Pool metadata
    D --> D: Build swap msg for target dex
    D ->> A: Forward execution
    Note over REG, A: DexMsg
    A ->> T: Execute
    Note right of A: DexMsg
Dependency Execution
In this example, we use the Equilibrium App’s Rebalance function as an example. Modules
with dependencies (equilibrium:balancer is dependent on abstract:etf and abstract:dex) have their addresses
dynamically resolved when called.
sequenceDiagram
    autonumber
    actor U as User
    participant B as equilibrium:balancer
    participant A as Account
    participant D as abstract:dex
    participant T as Target Dex
    U ->> B: Rebalance
    B -->>+ A: Query Allocations
    A -->>- B: Allocations
    B --> B: Calculate rebalancing requirements
    B -->>+ A: Query abstract:dex address
    A -->>- B: Address
    B ->> D: Call SwapRouter on dex
    D --> D: Build swap msg for target dex
    D --> D: Load account address
    D ->> A: Forward execution
    Note over A: DexMsg
    A ->> T: Execute
    Note over D, A: DexMsg
s
Tools and Libraries
At Abstract, we are dedicated to expanding the horizons of blockchain development through our innovative and ever-growing suite of products. Our products aim to simplify and enhance the development process, allowing creators to bring their visions to life with efficiency and security.
Abstract App Template
- Quick Start: Jumpstart your app development with our robust template.
- Integration Friendly: Easy to integrate with existing systems.
- TypeScript Support: Build with confidence using TypeScript.
CW-Orchestrator
- Scripting Power: Simplify your interactions with CosmWasm contracts.
- Macros for Efficiency: Generate type-safe interfaces to streamline your workflow.
- Code Reusability: Use the same logic for testing and deployment.
Abstract JS
- Seamless Interactions: Engage with the blockchain from your web application effortlessly.
- Type Declarations: Develop with type safety in mind.
- Comprehensive: From queries to transactions, we’ve got you covered.
Abstract SDK
The attentive reader will already know that the Abstract SDK is a Rust library that is tightly integrated with Abstract’s on-chain infrastructure. More importantly though, the Abstract SDK is a tool that allows developers to easily perform accounting-based operations and interactions with other smart contracts within their own module.
From a high-level perspective, modules built with the Abstract SDK can use on-chain dependencies (other modules) to isolate specific functionalities. In this way, a module built with the Abstract SDK can explicitly define its dependencies and use them to perform complex multi-contract interactions with very minimal code. This, in turn, allows you to focus on the novel functionality of your application without inheriting the complexity of the underlying infrastructure.
SDK Features
At the heart of the Abstract SDK are “features” - Rust traits that can be seen as building blocks you can combine in various ways. Each feature provides a specific capability or function. By composing these features it is possible to write advanced APIs that are automatically implemented on objects that support its required features.
APIs
Abstract APIs are Rust structs that can be constructed from within a module if that module implements a set of features. Most of these features will already be implemented by us, so don’t have to worry about their implementation.
These retrievable API objects then exposes functions that simplify module development.
For example, the Bank API allows developers to transfer assets from and to an address. The Bank API can be constructed and used as follows:
// Construct the Bank API
let bank: Bank = app.bank(deps.as_ref());
// Do a transfer
let transfer_action: AccountAction = bank.transfer(vec![asset.clone()], recipient)?;
Note: The
BankAPI is just one of the many APIs that are available in the Abstract SDK. You can find a list of all available APIs (and how to build one yourself) in theabstract-sdkRust docs section.
We’ll dive deeper into the Abstract SDK’s APIs in the Build With Abstract section.
Module Bases
Our module bases are generic CosmWasm contract implementations that:
- Have some state and functionality already implemented.
- Can be extended and composed by appending your custom logic to them.
Think of each of these bases as a foundation for building your application using the Abstract SDK. There are different types of bases available, each tailored for specific needs and functionalities.
We will go into the technical details of these bases and their differences in the Build With Abstract section.
Need a reminder on what the differences are between these bases? Check out the module types page.
Example: Autocompounder
Let’s take a look at what an Autocompounder app built with the Abstract SDK would look like. This Autocompounder has a dependency on two adapters, a Dex and Staking adapter. Drawing out the architecture would result in something like this:
flowchart LR
    subgraph Autocompounder Application
        direction BT
        Autocompounder -.-> Dex
        Autocompounder -.-> Staking
        Staking --> Account
        Autocompounder --> Account
        Dex --> Account
    end

    User[fa:fa-users Users] ==> Autocompounder
The Account is a smart-contract that function as smart-contract wallet infrastructure. It holds the application’s funds. We covered the Account architecture in detail here.
Each solid arrow represents permissions to perform actions on behalf of the account. These permissions allow the contracts to move funds, interact with other contracts through the account, and perform other actions. It does this by sending messages to the account, which then executes them on behalf of the module. This is the basic idea behind account abstraction and is further elaborated in on the account abstraction page. Now, let’s focus on the dotted arrows.
Each dotted arrow indicates a dependency between modules. These dependencies are explicitly defined in the module that takes on the dependencies and are asserted when the module is installed. In this example the Autocompounder module is able to access special functionality (like swapping or staking assets) from its dependencies (the dex and staking adapters). Through this mechanism, a major reduction in the application’s amount of code and complexity is achieved.
From a developer ecosystem standpoint, this modular approach encourages collaboration and cross-team code re-use, a practice that has been proven to accelerate development and increase developers’ productivity.
CW-Orchestrator
Cw-orchestrator is the most advanced CosmWasm scripting, testing, and deployment tool designed to simplify interactions with CosmWasm smart contracts. It provides a set of macros that generate type-safe interfaces for your contracts, it not only enhances the code’s readability and maintainability but also reduces testing and deployment overhead. We encourage developers to publish their cw-orchestrator libraries for effective inter-team collaboration.
Furthermore, cw-orchestrator allows for code reusability between testing and deployments, making it our primary tool in enabling Abstract’s infrastructure to be highly available.
Usage
Here’s a snippet that sets up the complete Abstract SDK framework on a cw-multi-test environment, and deploys the Counter App to the App store.
#![allow(unused)]
fn main() {
// Create a sender and instantiate the mock environment
let sender = Addr::unchecked("sender");
let mock = Mock::new(&sender);

// Construct the counter interface (a wrapper around the contract's entry points)
let contract = CounterApp::new(COUNTER_ID, mock.clone());

// Deploy Abstract to the mock
let abstr_deployment = Abstract::deploy_on(mock, sender.to_string())?;

// Create a new account to install the app onto
let account =
    abstr_deployment
        .create_default_account(GovernanceDetails::Monarchy {
            monarch: sender.to_string(),
        })?;

// Claim the namespace so app can be deployed
abstr_deployment
    .registry
    .claim_namespace(1, "my-namespace".to_string())?;

// Deploy the app!
contract.deploy(APP_VERSION.parse()?)?;
}
For more details on how to use cw-orchestrator, please refer to the cw-orchestrator Documentation, where you can find a quick start and a detailed guide on how to use the tool with your smart contracts, supported chains and more. Also, check out the cw-orchestrator Github Repo for more details about the tool’s code.
Abstract JS
Abstract.js is a comprehensive Typescript library designed to make integrating with an on-chain Abstract application as easy as possible. We based the SDK on viem, the most popular EVM Typescript library.
Features
- Modular & Lightweight 🏗️ : Built with ESM for tiny bundle sizes and tree-shaking optimizations
- Code Generation 🛠️ : Auto-generate Typescript interfaces and classes for every Abstract module used by your app. functionalities required for on-chain operations.
- React Support ⚛︎️: We have a huge library of hooks to make it easy to interact with Abstract Accounts, ICAAs, modules, and Abstract apps.
- Wallet-Provider Agnosticism: We support Cosmos Kit, Graz, and XION’s Abstraxion.js. Creating a new wallet provider is also easy and automatically-compatible.
Installation
Please refer to the Official Abstract.js Documentation.
To install the main library:
npm i @abstract-money/core
For React-specific functionalities:
npm i @abstract-money/react
Abstract App Template
The Abstract App Module Template is a starting point for developing apps that enable features or transform Abstract Accounts into standalone products.
For a deeper understanding of Abstract Accounts, please refer to the abstract accounts documentation. If you need a refresher about apps, consult the app module documentation.
The primary focus of the Abstract App Template is to provide a template for building a new Abstract App, as well as support for generating TypeScript client code for the contract, which can then be imported into a frontend application.
Getting Started
To get started, please go to the Abstract App Template Github Repo and follow the instructions in the README.
In there you can find instructions on how to generate a new Abstract App, how to test it, deploy it, and generate TypeScript client code.
Account Console
The Account Console is in beta. Please report any issues you encounter on our Discord.
The Account Console is a web-based developer tool that allows you to inspect and interact with your Abstract Accounts.
It also allows you to easily view the abstract-specific infrastructure details like the Abstract Name Service or the Registry.
The Account Console offers:
- Account Management: Create, update, and delete accounts.
- Module Management: Install, update, and delete modules.
- Name Service: Register and manage human-readable names for your accounts.
- Dev Tools: Visual contract message builder, contract explorer, and more.
Note that using the Console is not required to develop on Abstract. All the features available in the console can be accessed programmatically using the Abstract Client crate. Using the Abstract Client crate is recommended for production use cases.
Accessing the Account Console
You can access the Account Console where you can create an account, claim namespaces and more by visiting console.abstract.money. You will be able to select the network you want to connect to, and then proceed to create your Abstract Account.
Account Management
Create Account
Creating an account is straightforward process. Once in the Account Console, click “Create Account”. You will be able to select the network you want to connect to, and then proceed to create your Abstract Account.
Are you having trouble creating an account? Please contact us on Discord and we’ll help you out.
Once the account is created, you can see the overview of the account among other details.
Claim a Namespace
Now that you have your account you can proceed to claim your namespace. The namespace will be exclusively linked to your Abstract Account and will prefix your module names to form a unique module identifier.
For example, if your namespace is
myappand your module name ismymodulethen your module identifier will bemyapp:mymodule.
You can easily claim your namespace by going to your Account on our website and click the “Claim Namespace” button on the account page. You will be asked to pay a small fee to claim your namespace. This fee is used to prevent namespace squatting and to help us maintain the Abstract ecosystem.
Please be aware that you need access to claim namespace on mainnet. Reach out to us on discord.
The Abstract App Design Space
The Abstract SDK broadens your design space beyond traditional smart contract application architectures. While applications built with standalone smart contracts can also be crafted using the SDK, the Abstract SDK promotes a level of code reusability that goes beyond stand-alone smart contract development. It is through this code reusability that novel applications can be constructed with little effort in a short time.
Design Spaces Explained
Traditional: Hosted Applications
Traditionally applications have been created by composing “stand-alone” smart contracts. With each smart contract designed to fulfill a different role in the application’s logic. We call these applications hosted applications since they’re deployed and controlled by the code maintainers, and to use them, users transfer funds to the application’s smart contract. Dexes, lending markets, yield aggregators are all examples of hosted applications.
flowchart LR
    subgraph Developer Team [fas:fa-users-cog Developer Team]
    %% subgraph Application
        direction BT
        A[Application]
    %% end
    end

    User[fa:fa-users Users] ==> A
Building a Hosted Auto-Compounder
Hosted applications can be built more efficiently with the Abstract SDK because of its modular design. As an example, let’s consider an auto-compounder application. The auto-compounder provides liquidity to DEX trading pairs and re-invests the received rewards into the pairs. The application’s logic can be split into three modules:
- DEX Adapter: Provides an interface to perform DEX operations. (e.g., swap tokens, provide liquidity, etc.)
- Staking Adapter: Provides an interface to perform staking operations. (e.g., claim rewards, stake, unstake, etc.)
- Auto-Compounder: Orchestrates the DEX and staking adapters to perform the auto-compounding logic.
If we visualize this application, we can see that the DEX and staking adapters are reusable components that can be used in other applications. The auto-compounder, in this approach, is a unique application that can be installed on an account and used by users to deposit into and withdraw from the auto-compounder application. The account essentially acts as a vault that holds all the users’ funds.
flowchart LR
    subgraph Autocompounder Application
        direction BT
        Autocompounder -.-> Dex
        Autocompounder -.-> Staking
        Staking --> Account
        Autocompounder --> Account
        Dex --> Account
    end

    User[fa:fa-users Users] ==> Autocompounder
This approach offers two significant benefits:
- Code Reusability: Developers can reuse the DEX and staking adapters in other applications. Furthermore, Abstract already provides a library of adapters for the most popular protocols. This saves you both time and money as you don’t need to write the integrations yourself.
- Security: The auto-compounder application’s logic is reduced to its bare minimum, making it easier to audit and maintain. Furthermore, the DEX and staking adapters are battle-tested smart contracts, which further reduces the attack surface.
Innovative: Self-Hosted (MyFi) Applications
Read our blogpost on Abstract MyFi for a less technical overview.
MyFi, short for My Finance, is a novel concept for “self-hosted applications” only achievable with Abstract’s unique application architecture. Here, users own their applications and don’t need to transfer funds to the application’s smart contract. Instead, they deploy the smart contract to their account, which grants the application rights to access those funds. Each application is a new instantiation of a smart contract that is owned and configurable by the user. The user can thus update the application’s code, parameters, and permissions at any time, without relying on the application’s maintainers.
flowchart LR
    subgraph Developers [fas:fa-users-cog Developers]
        direction RL
        A[App]
    end

    subgraph Acc1 [fas:fa-user User's Account]
        direction TB
        Ap1[App] --> A1[Account]
    end

    subgraph Acc2 [fas:fa-user User's Account]
        direction TB
        Ap2[App] --> A2[Account]
    end

    subgraph Acc3 [fas:fa-user User's Account]
        direction TB
        Ap3[App] --> A3[Account]
    end

    Store -.-> Ap1
    Store -.-> Ap2
    Store -.-> Ap3

    A ==> Store[fa:fa-store App Store]
This approach offers two significant benefits:
- Sovereignty: Users have more control over their funds as they don’t need to trust application maintainers.
- Customizability: Users can tailor their application, leading to novel customization options unavailable with hosted applications.
Let’s see how this applies to the auto-compounder application from before:
Building a Self-Hosted Auto-Compounder
The auto-compounder application can easily be converted into a self-hosted application. Again, by self-hosted we mean that instead of users moving their funds to an externally owned account, they deploy the auto-compounder application to their own account. The auto-compounder application is now owned by the user and can be configured to their liking.
flowchart BT
    subgraph Alex[Alex's Account]
        direction TB
        A1[Autocompounder] -.-> D1[Dex]
        A1[Autocompounder] -.-> S1[Staking]
        S1[Staking] --> C1[Account]
        A1[Autocompounder] --> C1[Account]
        D1[Dex] --> C1[Account]
    end

    subgraph Sarah[Sarah's Account]
        direction TB
        A2[Autocompounder] -.-> D2[Dex]
        A2[Autocompounder] -.-> S2[Staking]
        S2[Staking] --> C2[Account]
        A2[Autocompounder] --> C2[Account]
        D2[Dex] --> C2[Account]
    end

    AppStore[fa:fa-store App Store] ==> A1
    AppStore[fa:fa-store App Store] ==> A2
With this setup Alex and Sarah can both use the auto-compounder application, but they can configure it to their liking. For example, Alex can configure the auto-compounder to compound his rewards every 24 hours, while Sarah can configure the auto-compounder to compound her rewards every 12 hours. This approach allows for a very customizable and personalized experience.
Abstract SDK - How to get started

Welcome to the builder section of the Abstract documentation. The following sections will walk you through the process of setting up your development environment, creating an App Module and deploying it to our on-chain registry so that it can be used by others.
Coming from 👾EVM👾 ? Be sure to read up on CosmWasm and its differences from EVM in the CosmWasm section.
Tools used in this guide
Here are the most important tools you will need to know about to get started with the Abstract SDK:
-
A minimal understanding of Rust is expected. If you are new to Rust, you can find a great introduction to the language in the The Rust Book.
-
The Abstract SDK is built using the CosmWasm smart-contract framework. If you are new to CosmWasm, you can find a great introduction to the framework in the CosmWasm Book.
-
Abstract also makes extensive use of cw-orchestrator, our CosmWasm scripting library. You can read its documentation here.
Recommended tools
- Rust Analyzer: Rust Analyzer is a language server that provides IDE support for Rust. If you use VS-Code it’s highly recommended.
- Intellij Rust Plugin: open-source Rust plugin compatible with all IntelliJ-based IDEs. You are going to need it if you are using the Intellij IDEA Community Edition IDE, however it’s not needed for the Rust Rover.
- Just: Just is a command runner that we use to improve the development flow. You can install it by following the instructions on the Github repository.
Setting up the environment
Before you get started with the Abstract SDK, you will need to set up your development environment. This guide will walk you through the process of doing just that.
Experienced with CosmWasm? Skip to the Using The Template section.
Rust
To work with the SDK you will need a Rust toolchain installed on your machine. If you don’t have it installed, you can find installation instructions on the official Rust website.
WASM
Additionally, you will need the WASM compile target installed to build WASM binaries. You will need rustup, which you got when installing Rust on the previous step. To install it the WASM compile target, run:
$ rustup target add wasm32-unknown-unknown
> installing wasm32-unknown-unknown
Docker
Docker is used to create a containerized environment for facilitating reproducible builds. Specifically we’ll be using Cosmwasm Optimizer.
Git
You will also need git installed to clone our template repository. You can find instructions for installing git on your operative system here.
Using the Template
Now we’ll get you set up with the Abstract App template which contains:
- A scaffold app module with:
- A basic contract
- cw-orchestrator interface and deployment script
- Integration tests
- A set of just commands that will help you in your development.
Go to our App Template on Github and click on the “Use this template” button to create a new repository based on the template. You can name the repository whatever you want, but we recommend using the name of your module.
Go ahead and read through the readme of the template repository to learn how it is structured. It contains instructions on how to set up your development environment, useful commands you can perform using just, how to test and deploy your app, and more.
Contract file structure
The template contains a scaffold contract that you can use as a starting point for your own contract. The contract is located in the src directory and is structured as follows:
contract.rs: Top-level file for your module. It contains the type definition of you module and the const builder that constructs your contract. It also contains a macro that exports your contract’s entry points. You can also specify the contract’s dependencies here.error.rs: Error types that your contract can return.msg.rs: Custom message types that your contract can receive. These messages also havecw-orchestratormacros attached to them which comes in useful when you are writing your integration tests.state.rs: State types that your contract will use to store state to the blockchain.interface.rs: Interface that your contract will use to interact with thecw-orchestratorlibrary.replies/: Reply handlers that your contract will use to handle replies.handlers/: Message handlers that your contract will use to handle the different messages it can receive.
If there’s anything you don’t understand about the template please don’t hesitate to reach out to us on our Discord server.
Tools used in the template
The following Rust tools are used extensively in our template to improve your productivity.
- Taplo: The CI shipped with the template will perform formatting checks. To ensure you pass the checks, you can install Taplo and use the
just formatcommand to format your code and toml files. - Nextest: A better cargo test runner.
- Cargo Limit: Prioritizes errors over warnings in compile output as well as some other small improvements.
- Cargo Watch: Allows you to automatically re-run compilation when files change. This is useful when you are working on the contracts and want to fix compiler errors one by one.
You can install them by running just install-tools. All the tools are built from the source by Cargo.
Module Builder
Abstract provides multiple module bases, as detailed in our section on modules.
These bases (App and Adapter) implement some basic functionality and store some abstract-related state that will enable you to easily interact with our infrastructure through our SDK (which we’ll introduce later).
For now just know that we provide you with a builder pattern that allows you to easily add custom logic to these module bases. In the rest of this section we’ll outline how you can use this builder pattern to add custom functionality to your contract.
Overview
The builder pattern employed in building an Abstract module is a slight variation of the actual “builder” design pattern. Instead of creating a new builder at runtime, our module builder lets you set custom attributes on your module at compile time, meaning you end up with a const value can be heavily optimized by the compiler. This system ensures that the overhead of using Abstract has little effect on both the code’s runtime and WASM binary size.
The code-snippets in this example can be found in the app template.
In this tutorial we will be working on an App module.
App Type
Your custom AppType will be a type alias for a specific type that fills in the base AppContract type provided by the abstract-app crate. By constructing this type you’re defining which messages you expect to receive at the custom endpoints of your contract.
Here’s what this looks like in the template:
// src/contract.rs
pub type App = AppContract<AppError, AppInstantiateMsg, AppExecuteMsg, AppQueryMsg, AppMigrateMsg>;
The type above contains all the mandatory types (Error, Instantiate, Execute, Query). An optional MigrateMsg type is also added to allow you to customize the migration logic of your contract.
This new App type alias will be used in a few more places throughout the contract, so it’s a good idea to define it at the top of the file.
Module ID
The Module identifier (Module ID) is a string that will identify your application. We covered it in detail in the section on modules, here.
You define your ID as a &'static str like so:
pub const APP_ID: &str = "my-namespace:app";Module Version
This is the version of your module. The version will be stored on-chain. When installing a module that depends on your module, our infrastructure will assert its version requirements. Ensuring that the contracts that depend on each other are version compatible. We’ll cover dependencies in more detail in the dependencies section.
pub const APP_VERSION: &str = env!("CARGO_PKG_VERSION");By default you should use the version of your package as your app version. That is what the env! macro is doing in the example above. Alternatively you can provide any 3-digit version number as a valid version.
Build The App
Now that you have defined your type and all your attributes you can begin using the builder. To initiate this, first create the builder for the App:
// src/contract.rs
const APP: App = App::new(APP_ID, APP_VERSION, None)
The builder constructor takes three variables:
module_id: The module ID is a string that we defined above.contract_version: The contract version.metadata: An optional URL that can be used to retrieve data off-chain. Can be used with the Abstract Metadata Standard to automatically generate interactive front-end components for the module. This is explained in more detail in the metadata section.
Amazing! You now have a very basic Abstract module. You can now add your custom logic to your module by adding handlers to the module.
Below we’ve defined a complete App module with a few custom handlers set:
const APP: App = App::new(APP_ID, APP_VERSION, None)
    .with_instantiate(handlers::instantiate_handler)
    .with_execute(handlers::execute_handler)
    .with_query(handlers::query_handler)
    .with_migrate(handlers::migrate_handler)
    .with_replies(&[(INSTANTIATE_REPLY_ID, replies::instantiate_reply)]);
Handlers
The handler functions are defined in the
src/handlersdir.
The app can then be customized by adding handler functions for your endpoints. These functions are executed whenever a specific endpoint is called on the module.
Writing a handler function
These handlers are where you will write your custom logic for your App. For example, below we’ve defined a custom execute handler that handles all the different AppExecuteMsg variants of our module.
A special feature of these functions is that we insert the instance of your module into the function’s attributes. This enables you to access the module struct in your code. You will learn why this is such a powerful feature in the next section on the Abstract SDK.
// src/handlers/execute.rs
pub fn execute_handler(
    deps: DepsMut,
    _env: Env,
    info: MessageInfo,
    module: App,
    msg: AppExecuteMsg,
) -> AppResult {
    match msg {
        AppExecuteMsg::Increment {} => increment(deps, module),
        AppExecuteMsg::Reset { count } => reset(deps, info, count, module),
        AppExecuteMsg::UpdateConfig {} => update_config(deps, info, module),
    }
}
The code above should look very familiar. It’s only a slight variation of the code you would write in a regular CosmWasm contract. The only difference is that you have access to the module: App attribute, which is the instance of your module.
You can find more application code to read in our 💥 Awesome Abstract repository 💥.
Summary
The Abstract SDK allows you to easily make new custom smart contracts through a simple builder pattern and straight forward type system usage.
In the next section we’ll cover how you can use the module object that we make available in the function handlers to write highly functional smart contract code.
Ever wanted to swap on any cosmos DEX with only one line of code? Look no further!
Appendix
This appendix contains all the available handlers, what type of handler Fn they expect and the format of the messages that are exposed on the contract endpoints.
An overview of the available handlers:
with_execute: Called when the App’sExecuteMsgis called on the instantiate entry point.with_instantiate: Called when the App’sInstantiateMsgis called on the instantiate entry point.with_query: Called when the App’sQueryMsg::Moduleis called on the query entry point.with_migrate: Called when the App’sMigrateMsgis called on the migrate entry point.with_replies: Called when the App’s reply entry point is called. Matches the function’s associated reply-id.with_sudo: Called when the App’sSudoMsgis called on the sudo entry point.with_ibc_callbacks: Called when the App’sExecuteMsg::IbcCallbackis called on the execute entry point. Matches the callback’s callback ID to its associated function.with_module_ibc: Called when a Module wants to call another module over IBC.
In the case of adapters, the handlers are the same, except for with_migrate and with_sudo that are missing for reasons we explain in the adapter section.
For a full overview of the list of handlers available, please refer to the respective module type documentation:
Below, we examine each handler in greater detail. The base fields and variants mentioned in the messages below are defined by the base module type that you chose to use, an App in this case.
Instantiate
The instantiate entry point is a mutable entry point of the contract that can only be called on contract instantiation. Instantiation of a contract is essentially the association of a public address to a contract’s state.
Function Signature
Expected function signature for the custom instantiate handler:
/// Function signature for an instantiate handler.
pub type InstantiateHandlerFn<Module, CustomInitMsg, Error> =
    fn(DepsMut, Env, MessageInfo, Module, CustomInitMsg) -> Result<Response, Error>;
Message
In order to instantiate an Abstract Module, you need to provide an InstantiateMsg with the following structure:
#[cosmwasm_schema::cw_serde]
pub struct InstantiateMsg<BaseMsg, CustomInitMsg = Empty> {
    /// base instantiate information
    pub base: BaseMsg,
    /// custom instantiate msg
    pub module: CustomInitMsg,
}
When the module’s instantiate function is called the struct’s module field is passed to your custom instantiation
handler for you to perform any custom logic.
Execute
The execute entry point is a mutable entry point of the contract. Logic in this function can update the contract’s state and trigger state changes in other contracts by calling them. It is where the majority of your contract’s logic will reside.
Function Signature
Expected function signature for the custom execute handler:
/// Function signature for an execute handler.
pub type ExecuteHandlerFn<Module, CustomExecMsg, Error> =
    fn(DepsMut, Env, MessageInfo, Module, CustomExecMsg) -> Result<Response, Error>;
Message
Called when the App’s ExecuteMsg::Module variant is called on the execute entry point.
/// Wrapper around all possible messages that can be sent to the module.
#[cosmwasm_schema::cw_serde]
pub enum ExecuteMsg<BaseMsg, CustomExecMsg> {
    /// A configuration message, defined by the base.
    Base(BaseMsg),
    /// An app request defined by a base consumer.
    Module(CustomExecMsg),
    /// IbcReceive to process IBC callbacks
    /// In order to trust this, the apps and adapters verify this comes from the ibc-client contract.
    IbcCallback(IbcResponseMsg),
    /// ModuleIbc endpoint to receive messages from modules on other chains
    /// In order to trust this, the apps and adapters verify this comes from the ibc-host contract.
    /// They should also trust the sending chain
    ModuleIbc(ModuleIbcMsg),
}
The content of the Module variant is passed to your custom execute handler.
Query
The query entry point is the non-mutable entry point of the contract. Like its name implies it it used to retrieve data from the contract’s state. This state retrieval can have a computation component but it can not alter the contract’s or any other state.
Function Signature
Expected function signature for the custom query handler:
/// Function signature for a query handler.
pub type QueryHandlerFn<Module, CustomQueryMsg, Error> =
    fn(Deps, Env, &Module, CustomQueryMsg) -> Result<Binary, Error>;
Message
Called when the App’s QueryMsg::Module variant is called on the query entry point.
#[cosmwasm_schema::cw_serde]
#[derive(QueryResponses)]
#[query_responses(nested)]
pub enum QueryMsg<BaseMsg, CustomQueryMsg = Empty> {
    /// A query to the base.
    Base(BaseMsg),
    /// Custom query
    Module(CustomQueryMsg),
}
The content of the Module variant is passed to your custom query handler.
Migrate
The migrate entry point is a mutable entry point that is called after a code_id change is applied to the contract. A migration in CosmWasm essentially swaps out the code that’s executed at the contract’s address while keeping the state as-is. The implementation of this function is often used to change the format of the contract’s state by loading the data as the original format and overwriting it with a new format, in case it changed. All adapter base implementations already perform version assertions that make it impossible to migrate to a contract with a different ID or with a version that is lesser or equal to the old version.
Function Signature
Expected function signature for the custom migrate handler:
/// Function signature for a migrate handler.
pub type MigrateHandlerFn<Module, CustomMigrateMsg, Error> =
    fn(DepsMut, Env, Module, CustomMigrateMsg) -> Result<Response, Error>;
Message
Called when the App’s migrate entry point is called. Uses the struct’s module field to customize the migration. Only
this field is passed to the handler function.
#[cosmwasm_schema::cw_serde]
pub struct MigrateMsg<BaseMsg = Empty, CustomMigrateMsg = Empty> {
    /// base migrate information
    pub base: BaseMsg,
    /// custom migrate msg
    pub module: CustomMigrateMsg,
}
Reply
The reply entry point is a mutable entry point that is optionally called after a previous mutable action. It is
often used by factory contracts to retrieve the contract of a newly instantiated contract. It essentially provides the
ability perform callbacks on actions. A reply can be requested using CosmWasm’s SubMsg type and requires a
unique ReplyId which is a u64. The customizable handler takes an array of (ReplyId, ReplyFn) tuples and matches
any incoming reply on the correct ReplyId for you.
Function Signature
Expected function signature for the custom reply handler:
/// Function signature for a reply handler.
pub type ReplyHandlerFn<Module, Error> = fn(DepsMut, Env, Module, Reply) -> Result<Response, Error>;
Message
There is no customizable message associated with this entry point.
Sudo
The sudo entry point is a mutable entry point that can only be called by the chain’s governance module. I.e. any calls made to this contract should have been required to have gone through the chain’s governance process. This can vary from chain to chain.
Function Signature
Expected function signature for the custom sudo handler:
/// Function signature for a sudo handler.
pub type SudoHandlerFn<Module, CustomSudoMsg, Error> =
    fn(DepsMut, Env, Module, CustomSudoMsg) -> Result<Response, Error>;
Message
There is no base message for this entry point. Your message will be the message that the endpoint accepts.
Ibc Callback
The ibc callback handler is a mutable entry point of the contract. It is similar to the execute handler but is
specifically geared towards handling callbacks from IBC actions. Since interacting with IBC is an asynchronous process
we aim to provide you with the means to easily work with IBC. Our SDK helps you send IBC messages while this handler
helps you execute logic whenever the IBC action succeeds or fails. Our framework does this by optionally allowing you to
add callback information to any IBC action. A callback requires a unique CallbackId which is a String. The callback
handler takes an array of (CallbackId, IbcCallbackFn) tuples and matches any incoming callback on the
correct CallbackId for you. Every call to this handler is verified by asserting that the caller is the framework’s
IBC-Client contract.
Function Signature
/// Function signature for an IBC callback handler.
pub type IbcCallbackHandlerFn<Module, Error> =
    fn(DepsMut, Env, Module, Callback, IbcResult) -> Result<Response, Error>;
Message
Called when the App’s ExecuteMsg::IbcCallback variant is called on the execute entry point. The receiving type is not
customizable but contains the IBC action acknowledgment.
/// Wrapper around all possible messages that can be sent to the module.
#[cosmwasm_schema::cw_serde]
pub enum ExecuteMsg<BaseMsg, CustomExecMsg> {
    /// A configuration message, defined by the base.
    Base(BaseMsg),
    /// An app request defined by a base consumer.
    Module(CustomExecMsg),
    /// IbcReceive to process IBC callbacks
    /// In order to trust this, the apps and adapters verify this comes from the ibc-client contract.
    IbcCallback(IbcResponseMsg),
    /// ModuleIbc endpoint to receive messages from modules on other chains
    /// In order to trust this, the apps and adapters verify this comes from the ibc-host contract.
    /// They should also trust the sending chain
    ModuleIbc(ModuleIbcMsg),
}
Module Ibc
The module ibc handler is a mutable entry point of the contract. It is similar to the execute handler but is
specifically geared towards handling module-to-module IBC calls. On this endpoint, the sender is a module on a remote chain. Module developers should test the client_chain AND source_module variables against their local storage. Without it, any module could execute the logic inside this functio
Function Signature
/// Function signature for an Module to Module IBC handler.
pub type ModuleIbcHandlerFn<Module, Error> =
    fn(DepsMut, Env, Module, ModuleIbcInfo, Binary) -> Result<Response, Error>;
Message
Called when the App’s ExecuteMsg::ModuleIbc variant is called on the execute entry point. The receiving type is not
customizable. It contains :
client_chainthe remote chain identificationsource_modulethe sending module on the remote chainmsgthe message sent by the module. This is usually deserialized by the module’s developer to trigger actions.
/// Wrapper around all possible messages that can be sent to the module.
#[cosmwasm_schema::cw_serde]
pub enum ExecuteMsg<BaseMsg, CustomExecMsg> {
    /// A configuration message, defined by the base.
    Base(BaseMsg),
    /// An app request defined by a base consumer.
    Module(CustomExecMsg),
    /// IbcReceive to process IBC callbacks
    /// In order to trust this, the apps and adapters verify this comes from the ibc-client contract.
    IbcCallback(IbcResponseMsg),
    /// ModuleIbc endpoint to receive messages from modules on other chains
    /// In order to trust this, the apps and adapters verify this comes from the ibc-host contract.
    /// They should also trust the sending chain
    ModuleIbc(ModuleIbcMsg),
}

#[cw_serde]
pub struct ModuleIbcInfo {
    /// Remote chain identification
    pub chain: TruncatedChainId,
    /// Information about the module that called ibc action on this module
    pub module: ModuleInfo,
}
Dependencies
There is another method accessible on the module builder, which is the with_dependencies function. As it states it
allows you to specify any smart contract dependencies that your module might require. This is a key requirement for
building truly composable and secure applications. We’ll cover dependencies further
the dependencies section.
Custom Module Endpoints
Default modules have a fixed set of endpoints that are defined by the base message type shown below.
#![allow(unused)]
fn main() {
/// Wrapper around all possible messages that can be sent to the module.
#[cosmwasm_schema::cw_serde]
pub enum ExecuteMsg<BaseMsg, CustomExecMsg> {
    /// A configuration message, defined by the base.
    Base(BaseMsg),
    /// An app request defined by a base consumer.
    Module(CustomExecMsg),
    /// IbcReceive to process IBC callbacks
    /// In order to trust this, the apps and adapters verify this comes from the ibc-client contract.
    IbcCallback(IbcResponseMsg),
    /// ModuleIbc endpoint to receive messages from modules on other chains
    /// In order to trust this, the apps and adapters verify this comes from the ibc-host contract.
    /// They should also trust the sending chain
    ModuleIbc(ModuleIbcMsg),
}
}
However, you might need to specify an endpoint on the top-level of your module, requiring changes to the base message type. As we’ll discuss, this can be done by defining a custom module endpoint.
Defining a Custom Module Endpoint
To define a custom module endpoint, you need to create a new message type that extends the base message type. This new message type should contain the messages supported by the base massages. In other words, it should be a superset of the base message type.
For example, if you require your contract to accept a Receive(Cw20ReceiveMsg) endpoint to handle Cw20 deposits, then you can define a new message type as shown below.
#![allow(unused)]
fn main() {
pub enum CustomExecuteMsg {
    // Base message for your module type
    Base(abstract_app::std::app::BaseExecuteMsg),
    // Execute message for your module
    Module(AppExecuteMsg),
    /// Custom msg type
    Receive(cw20::Cw20ReceiveMsg),
}
}
Now the App object still expects the regular ExecuteMsg type, so you need to implement the CustomExecuteHandler trait for your custom message type to attempt to parse it into the base type.
When this try_into_base function returns an error, the custom_execute function will be called, allowing you to handle the custom message type.
#![allow(unused)]
fn main() {
impl CustomExecuteHandler<MyApp> for CustomExecuteMsg {
    type ExecuteMsg = crate::msg::ExecuteMsg;

    fn try_into_base(self) -> Result<Self::ExecuteMsg, Self> {
        match self {
            CustomExecuteMsg::Base(msg) => Ok(crate::msg::ExecuteMsg::from(msg)),
            CustomExecuteMsg::Module(msg) => Ok(crate::msg::ExecuteMsg::from(msg)),
            _ => Err(self),
        }
    }

    fn custom_execute(
        self,
        deps: DepsMut,
        env: Env,
        info: MessageInfo,
        module: MyApp,
    ) -> Result<Response, AppError> {
        match self {
            CustomExecuteMsg::Receive(cw20_msg) => {
                // Function that handles the custom message
                super::receive_handler(deps, env, info, module, cw20_msg)
            }
            _ => unreachable!(),
        }
    }
}
}
We realize this introduces a lot of boilerplate code. Alternatively the
serde(untagged)attribute could have been used but this increases wasm size and hurts performance significantly.
As a final change we need to update the entrypoint macro to include the custom message type.
#![allow(unused)]
fn main() {
#[cfg(feature = "export")]
abstract_app::export_endpoints!(APP, MyApp, CustomExecuteMsg);

abstract_app::cw_orch_interface!(
    APP,
    MyApp,
    MyAppInterface,
    CustomExecuteMsg
);
}
You can find a full example of a custom module endpoint in the payment module codebase.
Cw-orch Function Support
To enable your endpoints to be called on the contract’s interface you need to implement the From trait for the CustomExecuteMsg type. Where AppExecuteMsg is the module’s inner execute message as shown above.
#![allow(unused)]
fn main() {
// Enable cw_orch api
impl From<AppExecuteMsg> for CustomExecuteMsg {
    fn from(value: AppExecuteMsg) -> Self {
        Self::Module(value)
    }
}
}
Account SDK
![]()

Now that that you’re familiar with construction of your module you’re ready for our hot sauce. While you can traditional code in your module, using our SDK will give you a huge productivity boost. In short, we’ve created an account abstraction programming toolbox that allows you to easily control an Abstract Account’s interactions, as well as create your own APIs that can be used by other developers to interact with your unique application. Composability galore!
APIs
Abstract API objects are Rust structs that expose some smart contract functionality. Such an API object can only be constructed if a contract implements the traits that are required for that API. Access to an API is automatically provided if the trait constraints for the API are met by the contract.
We’ve created a set of APIs that can be used to interact with the Abstract Account and have implemented their trait requirements on the module base types that we provide (
AppandAdapter). So for you, it’s just plug and play! 🎉
Most of the APIs either return a CosmosMsg or an AccountAction.
CosmosMsg Example
The CosmosMsg is a message that should be added as-is to the Response to perform some action.
This example sends coins from the local contract (module) to the account that the application is installed on.
            // Get bank API struct from the app
            let bank: Bank<'_, MockModule> = app.bank(deps.as_ref());
            // Define coins to send
            let coins: Vec<Coin> = coins(100u128, "denom");
            // Construct messages for deposit (transfer from this contract to the account)
            let deposit_msgs: Vec<CosmosMsg> = bank.deposit(coins.clone()).unwrap();
            // Create response and add deposit msgs
            let response: Response = app.response("deposit").add_messages(deposit_msgs);

Ok(response)Custom CosmosMsgs can be added in the same way through the app.response("<action>") function. The action attribute of the function is a string that will be added to the response’s attributes and will be available in the transaction result under the wasm-abstract event. This way you can easily figure out which actions were called in a tx!
The above example can equally be written as:
#![allow(unused)]
fn main() {
let coins: Vec<Coin> = coins(100u128, "denom");
// Create CosmosMsg
let bank_msg: CosmosMsg = CosmosMsg::Bank(BankMsg::Send {
    to_address: "<account_address>".to_string(),
    amount: coins,
});
// Add to Response
let response: Response = app.response("deposit").add_message(deposit_msg);

Ok(response)
}
This gives you all the flexibility you are used to when working with CosmWasm!
AccountAction Example
The other kind of struct that can be returned by an Abstract API is the AccountAction. An AccountAction is a single, or collection of CosmosMsgs that should be executed on the App’s Abstract Account.
AccountActions can be executed with the Executor API. The returned CosmosMsg should be added to the action’s Response.
The following example sends coins from the account to another address. This action requires the account itself to execute the message and transfer the funds.
            let recipient: Addr = Addr::unchecked("recipient");
            let bank: Bank<'_, MockModule> = app.bank(deps.as_ref());
            let coins: Vec<Coin> = coins(100u128, "asset");
            let bank_transfer: AccountAction = bank.transfer(coins.clone(), &recipient).unwrap();

            let executor: Executor<'_, MockModule> = app.executor(deps.as_ref());
            let account_message: ExecutorMsg = executor.execute(vec![bank_transfer]).unwrap();
let response: Response = Response::new().add_message(account_message);So through the Executor API you can execute messages on behalf of the Account! Also notice that you can provide multiple actions to the executor to be executed in sequence.
How it works
As you’re aware, abstract-sdk crate is a toolbox for developers to create composable smart contract APIs. It does this through a combination of supertraits and blanket implementations, two concepts that are native to the Rust language.
Supertraits are Rust traits that have one or multiple trait bounds while a blanket implementation is a Rust trait implementation that is automatically implemented for every object that meets that trait’s trait bounds. The Abstract SDK uses both to achieve its modular design.
For more information about traits, supertraits and blanket implementations, check out the Rust documentation:
Usage
Add abstract-sdk to your Cargo.toml by running:
cargo add abstract-sdk
Then import the prelude in your contract. This will ensure that you have access to all the traits which should help your IDE with auto-completion.
use abstract_sdk::prelude::*;Creating your own API
The Bank API allows developers to transfer assets from and to the Account. We now want to use this API to create a Splitter API that splits the transfer of some amount of funds between a set of receivers.
// Trait to retrieve the Splitter object
// Depends on the ability to transfer funds
pub trait SplitterInterface: TransferInterface + AccountExecutor + ModuleIdentification {
    fn splitter<'a>(&'a self, deps: Deps<'a>) -> Splitter<'a, Self> {
        Splitter { base: self, deps }
    }
}

// Implement for every object that can transfer funds
impl<T> SplitterInterface for T where T: TransferInterface + AccountExecutor + ModuleIdentification {}

impl<T: SplitterInterface> AbstractApi<T> for Splitter<'_, T> {
    const API_ID: &'static str = "Splitter";

    fn base(&self) -> &T {
        self.base
    }
    fn deps(&self) -> Deps {
        self.deps
    }
}

#[derive(Clone)]
pub struct Splitter<'a, T: SplitterInterface> {
    base: &'a T,
    deps: Deps<'a>,
}

impl<T: SplitterInterface> Splitter<'_, T> {
    /// Split an asset to multiple users
    pub fn split(&self, asset: AnsAsset, receivers: &[Addr]) -> AbstractSdkResult<AccountAction> {
        // split the asset between all receivers
        let receives_each = AnsAsset {
            amount: asset
                .amount
                .multiply_ratio(Uint128::one(), Uint128::from(receivers.len() as u128)),
            ..asset
        };

        // Retrieve the bank API
        let bank = self.base.bank(self.deps);
        receivers
            .iter()
            .map(|receiver| {
                // Construct the transfer message
                bank.transfer(vec![&receives_each], receiver)
            })
            .try_fold(AccountAction::default(), |mut acc, v| match v {
                Ok(action) => {
                    // Merge two AccountAction objects
                    acc.merge(action);
                    Ok(acc)
                }
                Err(e) => Err(e),
            })
    }
}These APIs can then be used by any contract that implements its required traits, in this case the TransferInterface.
            let asset = AnsAsset {
                amount: Uint128::from(100u128),
                name: "usd".into(),
            };

            let receivers = vec![receiver1, receiver2, receiver3];

            let split_funds = module.splitter(deps.as_ref()).split(asset, &receivers)?;
            assert_eq!(split_funds.messages().len(), 3);

            let msg: ExecutorMsg = module.executor(deps.as_ref()).execute(vec![split_funds])?;

            Ok(Response::new().add_message(msg))
Features
Features are the lowest-level traits that are contained within the SDK and they don’t have any (custom) trait bounds. They generally act as data accessor traits. I.e. if a struct implements a feature it means that it has some way to get the information required by that feature.
Here’s an example of such a feature:
#![allow(unused)]
fn main() {
/// Accessor to the Abstract Name Service.
pub trait AbstractNameService: Sized {
    /// Get the ANS host address.
    fn ans_host(&self, deps: Deps) -> AbstractSdkResult<AnsHost>;

    /// Construct the name service client.
    fn name_service<'a>(&'a self, deps: Deps<'a>) -> AbstractNameServiceClient<'a, Self> {
        AbstractNameServiceClient {
            base: self,
            deps,
            host: self.ans_host(deps).unwrap(),
        }
    }
}
}
Any structure that implements this trait has access to the AnsHost struct, which is a wrapper around an Addr. Because that structure now has the address of that contract, it can resolve ANS entries.
Now instead of letting you implement these traits yourself, we’ve already gone ahead and implemented them for the App and Adapter structs.
So when you’re building your application, the module struct already has the features and data required to do abstract operations (😉). With this in place we can start creating more advanced functionality.
Appendix
Available API Objects
The following API objects are available in the Abstract SDK:
Other projects have also started building APIs. Here are some examples:
Cron Cats- More coming soon…
Abstract Client
As previously mentioned you can use our abstract-client package to interact with any instance of Abstract. For this example we’ll use the Mock environment for simplicity. However, the same functions can be used for any CwEnv.
You can read the
abstract-clientdocumentation for more information.
Example
#![allow(unused)]
fn main() {
    // Create environment
    let env: MockBech32 = MockBech32::new("mock");
    let sender: Addr = env.sender_addr();

    // Build the client
    let client: AbstractClient<MockBech32> = AbstractClient::builder(env.clone()).build()?;
}
These three lines:
- Created a mock environment to deploy to.
- Deployed Abstract to that environment and returned a client.
You can then start using the client to do all sorts of things. For example, you can set and query balances easily.
#![allow(unused)]
fn main() {
    let coins = &[Coin::new(50u128, "eth"), Coin::new(20u128, "btc")];

    // Set a balance
    client.set_balance(&sender, coins)?;

    // Add to an address's balance
    client.add_balance(&sender, &[Coin::new(50u128, "eth")])?;

    // Query an address's balance
    let coin1_balance = client.query_balance(&sender, "eth")?;

    assert_eq!(coin1_balance.u128(), 100);
}
Then, you can use the client to create a Publisher to publish an App to the platform.
#![allow(unused)]
fn main() {
    // Create a publisher
    let publisher: Publisher<MockBech32> = client
        .account_builder()
        .namespace(Namespace::from_id(TEST_MODULE_ID)?)
        .build()?
        .publisher()?;

    // Publish an app
    publisher.publish_app::<MockAppI<MockBech32>>()?;
}
Now that the App is published anyone can create an Account and install it!
#![allow(unused)]
fn main() {
    let accounti: Account<MockBech32> = client.account_builder().build()?;

    // Install an app
    let app: Application<MockBech32, MockAppI<MockBech32>> =
        accounti.install_app::<MockAppI<MockBech32>>(&MockInitMsg {}, &[])?;
}
Et voila! You’ve just deployed Abstract and an App to a mock environment. You can now start testing your module.
The Account object also has some useful helper methods:
#![allow(unused)]
fn main() {
    // Get account info
    let account_info: AccountInfo = accounti.info()?;
    // Get the owner
    let owner: Addr = accounti.owner()?;
    // Add or set balance
    accounti.add_balance(&[Coin::new(100u128, "btc")])?;
    // ...
}
You can explore more of its functions in the type’s documentation.
Your App Interface
The Application<_, MockAppI<_>> object returned from the install_app function is a wrapper around an Account that has an App installed on it (in this case MockAppI).
The MockAppI is a cw-orchestrator interface that exposes the contract’s functions as methods. This allows you to easily interact with your module directly or as a different address.
#![allow(unused)]
fn main() {
    // Install an app
    let app: Application<MockBech32, MockAppI<MockBech32>> =
        accounti.install_app::<MockAppI<MockBech32>>(&MockInitMsg {}, &[])?;
    // Call a function on the app
    app.do_something()?;

    // Call as someone else
    let account: Addr = accounti.address()?;
    app.call_as(&account).do_something()?;

    // Query the app
    let something: MockQueryResponse = app.get_something()?;
}
Testing Your Module
Testing your smart contracts is a crucial step in its development. Without proper testing you risk compromising the accounts of your users and with it the funds that they hold. For that reason we expect modules to be thoroughly tested before they are allowed on our platform.
This section of the documentation outlines the different testing methods. Each method is accompanied by an Abstract helper. These helpers assist you in setting up your testing environment.
Integration Testing
Integration testing your contract with Abstract involves deploying your contract and any of its dependencies to a mock environment where Abstract is deployed. To make this as easy as possible we’ve created a abstract-client package that you can use to deploy Abstract and any of your modules to a mock environment. We will cover this client in the next section.
But first we need to cover some basics.
Cw-orchestrator Mock environment
Most of our Abstract tests use cw-orchestrator’s Mock struct that is backed by a cw-multi-test::App which you might be familiar with.
The Mock struct provides a simulation of the CosmWasm environment, enabling testing of contract functionalities.
cw-orchestrator is a CosmWasm scripting tool that we developed to improve the speed at which we can test and deploy our applications. We recommend reading the cw-orchestrator documentation if you are not yet familiar with it.
Example
#[test]
fn can_execute_on_account() -> anyhow::Result<()> {
    let denom = "denom";
    let chain = MockBech32::new("mock");
    let client = AbstractClient::builder(chain.clone()).build()?;
    client.set_balances([(&client.sender(), coins(100, denom).as_slice())])?;

    let user = chain.addr_make("user");

    let account: Account<MockBech32> = client.account_builder().build()?;

    let amount = 20;
    account.execute(
        vec![BankMsg::Send {
            to_address: user.to_string(),
            amount: coins(20, denom),
        }],
        &coins(amount, denom),
    )?;

    assert_eq!(amount, client.query_balance(&user, denom)?.into());
    Ok(())
}
Details
The Mock encapsulates:
- A default sender for transactions.
- A state to map contract_id to its details.
- An emulation of the CosmWasm backend with app.
In this example, we use a setup function to initialize our test environment. The setup function is utilized to:
- Initialize the contract you want to test within the mock environment, the counter contract in this case.
- Upload and instantiate the contract.
- Retrieve essential details like code_id and contract address for further interactions.
This provides you with a streamlined approach to test and validate smart contract operations in a controlled setting.
Local Daemon Testing
Once you have confirmed that your module works as expected you can spin up a local node and deploy Abstract + your app onto the chain. You can do this by running the local_daemon example, which uses a locally running juno daemon to deploy to. At this point you can also test your front-end with the contracts.
Testing your application on a local daemon is difficult if it depends on other protocols, and those protocols don’t make use of cw-orchestrator as there is no easy way to deploy them to the local daemon.
Unit-testing
The lowest level of testing is unit testing. Unit tests allow you to easily test complex, self-contained logic. Because unit tests should be self-contained, any queries made to other contracts need to be mocked. These mocks act as “query catchers”, allowing you to specify a response for a specific query.
Sadly constructing these mock queries is time-consuming and involves a lot of boilerplate. Additionally, there are queries that your module should always support as they are part of its base implementation. For those reasons we created an abstract-testing package.
The abstract-testing provides you with some small abstractions that allow you to mock Smart and Raw queries with ease.
What’s the difference between a Smart and a Raw query?
-
Smart Queries: A smart query is a query that contains a message in its request. It commonly involves computation on the queried contract. After this optional computation and state loading, the contract responds with a ResponseMsg. Mocking this type of query involves matching the serialized query request message (
Binary) to a specific message type and returning a serialized response. Any expected computation needs to be mocked as well. -
Raw Queries: A raw query is a simple database key-value lookup. To mock this type of query you need to provide a mapping of the raw key to a raw value. The returned value then needs to be interpreted correctly according to the store’s type definitions.
Mock Querier
The abstract-testing package contains
a MockQuerierBuilder.
It uses the common builder pattern to allow for efficient mock construction. Let’s see how!
Mocking Smart Queries
Mocking a smart-query with
the MockQuerierBuilder
is easy! You do it by calling the with_smart_handler function.
Example
#![allow(unused)]
fn main() {
            let contract_address = api.addr_make("contract_address");
            let querier = MockQuerierBuilder::default()
                .with_smart_handler(&contract_address, |msg| {
                    // handle the message
                    let MockModuleQueryMsg {} = from_json::<MockModuleQueryMsg>(msg).unwrap();
                    to_json_binary(&MockModuleQueryResponse {}).map_err(|e| e.to_string())
                })
                .build();
}
Mocking Raw Queries
Instead of manually mapping the key-value relation and it’s types, we can use the available contract storage types. Using the storage types ensures that the mock and its data operations are the same as in the actual implementation. It also saves us a lot of work related to key serialization.
This approach allow you to easily map Item and Map datastores.
Example
#![allow(unused)]
fn main() {
            let contract_address = api.addr_make("contract_address");
            let querier = MockQuerierBuilder::default()
                .with_raw_handler(&contract_address, |key: &str| {
                    // Example: Let's say, in the raw storage, the key "the_key" maps to the value "the_value"
                    match key {
                        "the_key" => to_json_binary("the_value").map_err(|e| e.to_string()),
                        _ => to_json_binary("").map_err(|e| e.to_string()),
                    }
                })
                .build();
}
Items and Maps
The MockQuerierBuilder also provides a with_items and with_maps function. These functions allow you to easily mock Item and Map datastores.
Abstract Querier
The easiest and best way to start using the querier is to use
the AbstractMockQuerierBuilder::mocked_account_querier_builder() method. This method sets up a mock querier with an
initial Abstract Account.
Module Deployment
Deploying your module is an easy 3-step process: Module Uploading, Registration and Schema Linking. Let’s go over each step in detail.
This doc assumes you’re using the module app template, if you’re not we recommend looking at the relevant files in the template to set up your own deployment process.
Module Uploading
Uploading your module involves first compiling your module as a WASM binary and then uploading it to the network(s) you want your module to be available on. This will yield you a code_id that is a unique identifier for your module on the network.
Compiling your module
Once you have confirmed that your module works as expected you can spin up a local node and deploy Abstract + your app onto the chain. You need Docker installed for this step.
You can compile your module by running the following command:
$ just wasm
> Compiling to WASM...
The WASM optimizer uses a docker container to compile your module. If you don’t have docker installed you can install it from here.
This should result in an artifacts directory being created in your project root. Inside you will find
a my_module.wasm file that is your module’s binary.
Publish your module
Before attempting to publish your app you need to add your mnemonic to the .env file. Don’t use a mnemonic that has mainnet funds for this. Make sure this account has funds. If you don’t have the deployment will fail. Get funds from respective chain faucets or ask for some test tokens on Abstract Discord.
Now you can go ahead and publish the module to the network(s) you want to make it available on. You can do this by running the following command:
$ just publish uni-6
> Deploying module...
This will use the module’s examples/publish.rs script to deploy the module to the uni-1 network. The resulting
code-id of your contract should now be in the state.json file created for you. The script will also attempt to
register the module on the Abstract Registry, hence the mnemonic used in the script should be the same as the one
you used to create the account and register the namespace.
JSON Schema Linking
To improve the user-experience for developers using your module we recommend linking your module’s JSON schema to the Abstract Registry. This will allow developers (and you) to use the Abstract web app to interact with your module.
You need to install github cli for this step.
Follow these install instructions as per your operating system needs.
To link your module’s schema you can run the following command:
$ just publish-schemas <namespace> <name> <version>
> Publishing schemas...
Where you fill the <namespace>, <name> and <version> with the same values you used to register your module on the
Abstract Registry.
Module Installation
To install your module, go to the Abstract Account Dashboard, enter the dev-mode by clicking Enter Dev Mode on Action tab, go to your Account (or a new one) and click on the Modules tab. Here you will find a list of all the modules you have
registered on the Abstract Registry. Click on the Install button next to your module and select the network you
want to install it on. This will open a modal with the following fields:
Dependencies
A dependency is a piece of software that a developer relies on to implement his/her own application. By relying on this external code, the developer doesn’t need to implement the dependency’s functionality himself.
Abstract allows you to add other smart contracts as dependencies to your module. Doing so enables you to keep your app’s complexity low and focus on the core functionality of your module while leveraging the functionality of battle-tested code.
Your module’s configured dependencies are asserted on-chain when your module is instantiated. This way Abstract ensures that all dependencies are met before your module is installed, preventing API mis-matches and other issues.
We’ll cover how to declare your dependencies and then how to ensure you have them installed them before you try to install your own module.
Declaring Dependencies
Declaring a dependency is a two-step process:
First, you specify the dependency itself using the StaticDependency struct. The struct contains the ID for the module you wish to depend on, as well as an array of version requirements. The formatting and assertion of these requirements are identical to Cargo’s version requirement functionality.
#![allow(unused)]
fn main() {
use abstract_app::std::EXCHANGE;
use abstract_app::std::objects::dependency::StaticDependency;

const DEX_DEP: StaticDependency = StaticDependency::new(EXCHANGE, &[">=0.3.0"]);
}
Once configured, you can add the dependency to your module using the with_dependencies method on the App struct. This method takes a slice of StaticDependency structs and asserts that all dependencies are met when the module is instantiated.
#![allow(unused)]
fn main() {
const APP: BalancerApp = BalancerApp::new(BALANCER, MODULE_VERSION, None)
// ...
.with_dependencies(&[DEX_DEP]);
}
You can now safely start using the Abstract APIs that should be included in any of your dependencies.
Dependency Installation
Before you can install your own module you must install all your module’s dependencies. To do this we provide a DependencyCreation trait that you should implement for your module. The goal of the trait is to enable you to configure which dependencies should be installed and with which parameters.
Here’s an example using our dollar-cost-average app that depends on CronCat and our DEX adapter.
#![allow(unused)]
fn main() {
const APP: PaymentApp = PaymentApp::new(APP_ID, APP_VERSION, None)
    .with_instantiate(handlers::instantiate_handler)
    .with_execute(handlers::execute_handler)
    .with_query(handlers::query_handler)
    .with_migrate(handlers::migrate_handler)
    // Specify dependencies
    .with_dependencies(&[DEX_DEPENDENCY]);
}
Neither dependencies require any configuration on instantiation so the DependenciesConfig can be Empty.
The dependency_install_configs function should return all the ModuleInstallConfigs that are required to install the dependencies for your application. In this example the configs are comprised of:
- Any dependencies that might be required by the CronCat App.
- The CronCat App itself.
- The DEX Adapter.
With these specified, our abstract-client crate can install all your modules and their dependencies when you install your app, like so:
#![allow(unused)]
fn main() {
    let accounti: Account<MockBech32> = client.account_builder().build()?;

    // Install an app
    let app: Application<MockBech32, MockAppI<MockBech32>> =
        accounti.install_app::<MockAppI<MockBech32>>(&MockInitMsg {}, &[])?;
}
The next section goes deeper into the abstract-client and how you can use it create accounts, publish modules and install your modules!
Module Dependency Assertion
For the curious, here’s how the process of installing a module and checking module dependencies looks:
sequenceDiagram
    autonumber
    actor U as Owner
    participant A as Account
    participant F as Module Factory
    participant Mo as Module

    U ->> A: Install Module
    A -->> F: Install Module
    opt App instantiate
    F -->> Mo: Instantiate Module
    end
    A -->> Mo: Query Module Dependencies
    A -->> A: Assert Dependency Requirements
    A -->>+ A: Add Module as Dependent on its Dependencies
    A -->>+ A: Allowlist Module
IBC capabilities
![]()
Abstract provides multiple IBC capabilities to every module. Within the framework, there are two ways to interact with other blockchains through IBC:
- Account IBC interaction
- Module IBC interaction
We start by giving an overview of these two mechanisms before diving in further on how you should use them as a developer and finally dive into the specific mechanism that makes them work.
Overview
Account IBC interaction
Abstract Account are able to send messages to other blockchains to execute actions. This allows any Abstract Account to create accounts on remote chains. This way, users create 1 account on their home chain and are able to execute any action on any IBC-connected chain. This kind of interaction can be likened to Cosmos’s Interchain Account (ICA) functionality. Use cases include:
- Executing actions on remote chains without having to care about the remote gas coin
- Cross-chain DCA strategies
- Cross-chain email
- …
- Whatever permission-less application you can think of
Limitations:
- This capability doesn’t allow modules to interact with one-another in a permissioned manner. Because all messages are sent via the account directly they could be modified by the user. This means that the receiving module, on the other chain, can’t be sure about the source of the message.
- Account execution doesn’t allow for IBC callbacks. This means that the result of IBC message execution sent via this route can’t be used to trigger following actions directly.
Learn more about Account Ibc interactions
Module IBC interaction
We developed this feature to Abstract to address the limitations present in the Account-IBC interactions. Module IBC allows modules to send messages directly to any other module present on a remote chains. This allows permissioned execution because the receiving module can verify and trust the origin of IBC packet. Uses cases include:
- Distribued Interchain Name Service
- Cross-chain NFTs
- Cross-chain payments without cross-chain tokens
- …
- Every IBC application can be built using Abstract !
After a message is successfully executed via IBC, callbacks can be executed on the sender module to execute code depending on the result of the original message. You can think of this mechanism as an asynchronous version of the reply mechanism over IBC.
Learn more about Account Ibc interactions
Recap
Abstract provides all the IBC-abstractions you need to build permissionless and permissioned IBC applications. Through the Module IBC mechanism, you can build meshed applications that interact with each other over different networks without having to worry about permissions, data structures, channel creation and maintenance, and all the other complexities that come with using IBC in CosmWasm.
IBC is a key feature of the Abstract framework and, as the ecosystem grows, we will continue to improve and expand the capabilities of our IBC offering.
Interchain Abstract Accounts
Introduction
Abstract Accounts have the capability to control Accounts on any chain supporting Abstract over the Inter-Blockchain Communication (IBC) protocol through Interchain Abstract Accounts (ICAAs). ICAAs allow for any Abstract Account to control Accounts, contracts, and liquidity on any chain, offering a chain-abstracted experience users and developers in the Interchain ecosystem.
Designed with versatility in mind, ICAAs are able to execute messages locally and remotely, supporting both single- and multi-hop executions.
flowchart
    subgraph Account IBC
        direction LR
        subgraph Chain B
        A4[Account]
        end

        subgraph Chain A
        direction TB
        User2[fa:fa-user User] -- owns --> A3["Account"]
        A4[Account]
        end
        A3 -.IBC.-> A4
    end
If you’d rather watch a video, an overview of Interchain Abstract Accounts can be found here.
Integrating with Interchain Abstract Accounts
Enabling IBC on the Account
Users must install the ibc-client contract on their account to enable IBC. To do so they can call the ExecuteMsg::InstallModules endpoint with the abstract:ibc-client module ID.
#![allow(unused)]
fn main() {
pub enum ExecuteMsg{
    InstallModules {
        // Module information (module_id and version)
        modules: Vec<ModuleInstallConfig>,
    },
    //...
}
}
(Optional) Create an account on the remote chain
After the initialization step, the account is ready to send messages across IBC. However, if you wish, you can customize the remote account metadata before sending any messages. The following message is executed on the account contract:
#![allow(unused)]
fn main() {
pub enum AccountExecuteMsg {
    ExecuteOnModule {
        module_id: "abstract:ibc-client",
        exec_msg: IbcClientExecuteMsg {
            Register {
                host_chain: "destination-chain",
                // Customizable parameters
                base_asset: None,
                namespace: None,
                install_modules: vec![],
            },
            ...,
        }
    }
    ...,
}
}
Remember that this step is optional as accounts are created automatically when sending the first message across IBC.
Account ID structure
The remote Interchain Abstract Account will have the same account sequence but will have a different trace. Let’s take an example. A account on Neutron with account sequence 42 wants to create accounts on Osmosis and Stargaze.
- Their account ID on
Neutronislocal-42. - Their account ID on
Osmosisisneutron-42. - Their account ID on
Stargazeisneutron-42as well!
Remote accounts can create other remote accounts, and their traces will be chained. For instance, the neutron-42 account on Osmosis can create an account on Stargaze which will have the ID osmosis>neutron-42.
This gives the ability to trace ICAAs back to their origin chain.
Note that in code, inside the AccountTrace struct, the trace is defined backwards, For account osmosis>neutron-42, the trace will be:
AccountTrace::Remote(vec!["neutron", "osmosis"])
Sending messages on remote accounts
With or without a pre-existing remote Account, Abstract Accounts are able to send messages on remote Accounts. The account_msgs will be executed in order on the remote account.
#![allow(unused)]
fn main() {
pub enum AccountExecuteMsg {
    ExecuteOnModule {
        module_id: "abstract:ibc-client",
        exec_msg: IbcClientExecuteMsg {
            RemoteAction{
                host_chain: "destination-chain",
                action: HostAction{
                    Dispatch{
                        account_msgs: Vec<AccountExecuteMsg { ... }>
                    },
                    ...,
                }
            },
            ...,
        }
    }
    ...,
}
}
Note that the two instances of the AccountExecuteMsg enum are the exact same type. This allows you to send multi-hop IBC messages. However, multi-hop transactions (of these kind) are not really something you would use often, unless you’re using another chain as a routing chain.
Specification of Interchain Abstract Accounts
The following specification specifies packet data structure, state machine handling logic, and encoding details for the transfer of messages and creation of Abstract accounts over an IBC channel between a client and a host on separate chains. The state machine logic presented allows for safe multi-chain account creation and execution.
Motivation
Users of a set of chains connected over the IBC protocol might wish to interact with smart-contracts and dapps present on another chain than their origin, while not having to onboard the remote chain, create a new wallet or transfer the necessary funds to this other chain. This application-layer standard describes a protocol for interacting with a remote chain and creating Abstract Account on chains connected with IBC which preserves asset ownership, limits the impact of Byzantine faults, and requires no additional permissioning.
Definitions
The Abstract IBC Account interface is described in the following guide and the specifications are roughly presented here
Desired Properties
- Preservation of account and funds ownership
- All interactions that can be done by a local account should be possible for a remote account as well.
Technical Specification
General mechanism
Abstract IBC capabilities are allowed by the ibc-client<->ibc-host pair. The ibc-client is responsible for authenticating the sender and sending packets across IBC to the ibc-host. The ibc-host is responsible for receiving packets and routing the packet to the corresponding contract on the remote chain. Under the hood,the client-host connection is handled by a Polytone channel. This allows Abstract to be interoperable with other protocols, more resilient to IBC constraints. However, Abstract is not bound to Polytone and any other IBC relaying protocol could be used for relaying packets. Here is a simple schematic that explains the different components of the Abstract IBC infrastructure.
flowchart LR

    subgraph Osmosis[Osmosis Chain]
        Osmosis-Abstract-Account -.-> Osmosis-Client
        Osmosis-Client --> Osmosis-Note
        subgraph Osmosis-Polytone[Polytone]
            Osmosis-Note
        end
    end


    subgraph Neutron[Neutron Chain]
        subgraph Neutron-Polytone[Polytone]
            Neutron-Voice -.-> Neutron-Proxy
        end
        Neutron-Proxy --> Neutron-Host
        Neutron-Host -.-> Neutron-Abstract-Account
    end

    Osmosis-Note ==IBC==> Neutron-Voice
You see that an Abstract Interchain connection is uni-directional. You need 2 connections to be able to interact bi-directionnally with Abstract. Up until today however, only a local account can act on a distant account and not the other way around. Here is an examples using AccountId between neutron and osmosis:
local-42onneutronCAN controlneutron-42onosmosisvia IBCneutron-42onosmosisCAN’T controllocal-42onneutron
Account creation
Interchain Abstract Accounts are traditional Abstract Accounts controlled by the ibc-host. The ibc-host is the admin of the account and routes any packet sent by a remote account on the corresponding local account. When creating an abstract account, it is simply registered by the ibc-host using the account-factory just like any other account.
When an action is triggered by a remote account, the ibc-host does the following verifications:
- If an local account already exists on-chain for the remote account, it just dispatches the message to the account.
- If no account exists, it creates one with default metadata and THEN dispatches the messages to this new account.
The Account creation process is therefore not mandatory when interacting with Interchain Abstract Accounts. This is why when you create an Abstract Account, you automatically have an account on every connected chains!
Data Structures
Interchain Abstract Account communication is done via a single message structure:
#![allow(unused)]
fn main() {
pub enum IbcHostExecuteMsg{
    /// Allows for remote execution from the Polytone implementation
    #[cw_orch(fn_name("ibc_execute"))]
    Execute {
        account_id: AccountId,
        /// The address of the calling account id. This is used purely for the send-all-back method.
        /// We include it in all messages none-the-less to simplify the users life
        account_address: String,
        action: HostAction,
    },
    ...,
}
}
account-idis theidof the local account calling the action.account_addressis the address of the local account calling the action.actionis the action that should be executed by theibc-hoston the remote account:
#![allow(unused)]
fn main() {
#[cosmwasm_schema::cw_serde]
#[non_exhaustive]
pub enum InternalAction {
    /// Registers a new account from a remote chain
    Register {
        name: Option<String>,
        description: Option<String>,
        link: Option<String>,
        namespace: Option<String>,
        install_modules: Vec<ModuleInstallConfig>,
    },
}

#[cosmwasm_schema::cw_serde]
#[non_exhaustive]
pub enum HelperAction {
    SendAllBack,
}

/// Callable actions on a remote host
#[cosmwasm_schema::cw_serde]
pub enum HostAction {
    /// Dispatch messages to a remote Account.
    /// Will create a new Account if required.
    Dispatch {
        account_msgs: Vec<account::ExecuteMsg>,
    },
    /// Can't be called by an account directly. These are permissioned messages that only the IBC Client is allowed to call by itself.
    Internal(InternalAction),
    /// Some helpers that allow calling dispatch messages faster (for actions that are called regularly)
    Helpers(HelperAction),
}
}
Acknowledgement and Callback
IBC works with 4 steps:
- Sending a packet (Source chain)
- Receiving a packet (Destination chain)
- Sending an acknowledgement (Destination chain)
- Receiving an acknowledgement (Source chain)
We have already covered the 2 first steps with the sections above. We cover the 2 lasts steps in this section.
Step 3 (sending an ack), is handled by Polytone. They catch any error that could happen during contract execution and send back an acknowledgement reflecting the state of the contract execution on the remote chain. This is handled through the Callback struct.
For Step 4, Polytone allows for sending a message to the initial sender of the IBC interaction after the packet was successfully received in the remote chain. Abstract DOESN’T use this feature for user actions, so callbacks are not possible when using Interchain Abstract Accounts. If you are a module developer, check out the Module Ibc section that allows for callbacks.
Abstract only uses Polytone Callbacks when:
- Registering a new Abstract IBC counterpart, to store the remote Polytone
proxycaller. - Creating remote accounts to be able to store the remote Abstract
Accountaddress locally.
Cross chain trace
Because accounts created across chains using the IAA protocol are controlled by an account located on a remote chain, the account that is calling the action needs to be related to the account on the remote chain.
This is done through the AccountId struct. The IBC-host module leverages the AccountId::trace field of this struct. An account is wether AccountTrace::Local or AccountTrace::Remote. When a PacketMsg is sent across an IBC channel, the account id is transformed on the receiving chain in the following manner:
- If it was
AccountTrace::Localbefore transfer, it turns into anAccountTrace::Remoteaccount with one chain in the associated vector being the chain calling thePacketMsg(PacketMsg::client_chain) - If it was
AccountTrace::Remotebefore transfer, it stays remote and theclient_chainfield is pushed to the associated vector.
This allows full traceability of the account creations and calls.
Interchain Module Communication
Introduction
Interchain Abstract Accounts allow for executing actions on behalf of an Account on another chain. However, this mechanism doesn’t allow modules installed on these Accounts to communicate securely by default. To clarify this statement, imagine an Abstract module “X” on a chain. This module wants to send a message to another module “Y” on a remote chain. The module on the remote chain wants to ensure that the message was sent by module X.
In order to do so, the developer could attempt to send his message through the user’s Account using the Account IBC infrastructure. However, using this method it is impossible for module Y to verify that the content of the message was indeed sent by the origin module X. Executing actions through the Account is great for permissionless actions (like depositing assets into a protocol) but is unsuited for permissioned entry-points. So what now?
Secure Interchain Module Communication
To allow modules to send messages securely to other modules across IBC, we have developed an Interchain Module Communication (IMC) protocol. IMC allows developers to send messages from a module directly to another module on a different chain. The module that receives the IBC message can then access the source module details. This way IMC allows interoperable permissioned actions between all Abstract modules.
flowchart
    subgraph Module IBC
        direction TB
        subgraph Chain A
        Mod1[Module] ==> A1[Account]
        end

        subgraph Chain B
        Mod2[Module] ==> A2[Account]
        end
        Mod1 <-.IBC.-> Mod2
    end
Let’s see how to create a contract with IMC capabilities by following the ping-pong example app that you can find here.
Sending a message
In order to send a message, a module needs to interact with the ibc-client module. You can use the IbcClient API to interact with the ibc-client. The example below shows how the ping-pong app sends a message to an instance of itself on another chain.
#![allow(unused)]
fn main() {
    let self_module_info = module.module_info()?;
    let ibc_client: IbcClient<_> = module.ibc_client(deps.as_ref());
    let ibc_action: CosmosMsg = ibc_client.module_ibc_action(
        opponent_chain.clone(),
        self_module_info,
        // Start by playing a Ping
        &PingPongIbcMsg {
            hand: PingOrPong::Ping,
        },
        Some(Callback::new(&PingPongCallbackMsg::Pinged {
            opponent_chain,
        })?),
    )?;
}
opponent_chainis theTruncatedChainIdof the destination chain where the app is expected to be installed.target_moduledescribes the module on which the message will be executed on the remote chain. In this case, it is another instance of the ping-pong app.msgis the message that will be executed on the remote module via a custom endpoint. We explain in the section about receiving a message how this message is used by the targeted module.callback_infois used to request a callback once the packet has been received and acknowledged. We explain more about this behavior in the acks and callbacks section
When sending an IBC message, the call on the remote chain might fail. If you want to revert state based on that failure, you HAVE to use a Callback. If you don’t register a callback and the remote call fails, local state will NOT be reverted.
Receiving a message
In order for a module to receive a message coming from a remote Module, it needs to implement the module-ibc endpoint. The function signature for this endpoint is:
#![allow(unused)]
fn main() {
pub fn module_ibc(deps: DepsMut, env: Env, module: Module, source_module: ModuleIbcInfo, msg: Binary) -> Result<Response, Error>;
}
The deps, env and module variables are identical to the execute endpoint and should be clear to you by now. If not here are some links to more documentation:
depsandenvare described in the CosmWasm documentationmodule(orApporAdapterusually) are described in the Abstract SDK section of our docs
The msg variable contains the msg constructed by the module on the source chain. In this case the PingPongIbcMsg.
The source_module variable contains information about the module that sent the message, as well as the source chain information. This information can be used to assert the source of a message, like so:
#![allow(unused)]
fn main() {
pub fn receive_module_ibc(
    deps: DepsMut,
    env: Env,
    module: App,
    source_module: ModuleIbcInfo,
    msg: Binary,
) -> AppResult<Response> {
    let this_module_info = module.module_info()?;
    ensure_eq!(
        source_module.module,
        this_module_info,
        AppError::NotPingPong {
            source_module: source_module.module.clone()
        }
    );
    let ping_msg: PingPongIbcMsg = from_json(msg)?;
}
For example, the above code will return an error if the source module doesn’t match the receiving module. This way only other ping-pong apps can call this ping-pong app!
Callbacks
As mentioned callbacks can be added to the IBC flow progress or revert your contract’s state depending on the packets execution result.
Callback Execution
If a callback was requested when sending a module IBC message, the callback will be executed wether the execution was successful or not. A callback message will be executed on the ̀ibc_callback endpoint of the calling module. The function signature for this endpoint is:
#![allow(unused)]
fn main() {
pub fn ibc_callback(deps: DepsMut, env: Env, module: Module, callback: Callback, result: IbcResult,) -> Result<Response, Error>;
}
The callback variable contains a msg: Binary that is the encoded callback message that was provided to the callback on construction. In the ping-pong case this was PingPongCallbackMsg::Pinged.
The result contains the result data from the IBC packet execution. You can match against this result to assert that the remote execution was successful and roll back state if it was not.
Specification of Interchain Module Communication
This part is not yet done. This is an outstanding TODO for the Abstract Team. If you’re a module developer, you should have all the information you need in the previous sections. Good luck! 🚀
IBC Application Testing
One of the hardest steps in building an interchain application is testing. Due to the complexity of IBC and Cosmos SDK chains there are some trade-offs to consider in your approach to testing.
Testing Tools
This page aims to provide you with a high-level overview of the available testing tools and how to use them. That way you can make an informed decision on which tool is best for your application’s needs.
Mock IBC Testing
The easiest way to test your CosmWasm IBC application is by using cw-orchestrator’s mock IBC environment. This testing environment allows you to connect multiple Mock instances over a virtual IBC connection. Relaying is simulated and you can test your application’s IBC logic without needing to deploy it to a live chain.
Type: MockBech32Interchain
Advantages:
- Easy to set up and use.
- Very fast to execute.
- Easily configurable.
Disadvantages:
- Does not support custom Cosmos SDK modules.
- Not end-to-end.
- Can’t make use of existing on-chain infrastructure.
Starship
Starship is a kubernetes-based Cosmos SDK environment spawner. It allows you to spin up multiple Cosmos SDK blockchain networks and connect them together. It includes a relayer, faucet and block explorer. Allowing you to test your application in a more realistic environment.
Type: Starship
Advantages:
- Access to Cosmos SDK modules from your smart contract.
- End-to-end testing.
- Can be made available for front-end testing.
Disadvantages:
- Slow to execute.
- Requires more setup and knowledge to use.
- Can only run for limited time due to resource constraints.
Testnet
Type: DaemonInterchain
The final option is to deploy your application to a testnet. Doing this will ensure your application is tested in a real-world environment and makes it possible to start sharing what you’ve built with others. However, this approach is the most time-consuming and requires the most setup.
Advantages:
- Real-world testing.
- Can be shared with others.
- Can be used for marketing purposes.
Disadvantages:
- Slow to execute.
- Requires running your own relayer (or partnering with a relayer service).
- Testnets are often unstable.
Tooling Conclusion
Before you start testing your application, consider the trade-offs between the different testing environments. For most applications, using the mock IBC environment is the best choice. However, if you need to test your application with custom Cosmos SDK modules, you should consider using Starship. Finally, if you’re ready to share your application with the world, deploying to a testnet is the way to go.
Testing Abstract Apps
We’ve created helpers for you to test your Abstract App in any of the aforementioned environments. The rest of this page will show you how to use them.
We’ll be using the abstract-client crated which we covered in our section on testing. This crate includes a AbstractInterchainClient type that can be used to deploy and load abstract’s infrastructure to any of the testing environments.
Local & Mock Environments
For local and mock environments we provide the AbstractInterchainClient::deploy_on function. This function can take a MockBech32Interchain or Starship argument and it will deploy the Abstract contracts to the environment and set up the necessary IBC connections.
#![allow(unused)]
fn main() {
let interchain = MockBech32InterchainEnv::new(
        vec![("juno-1", "juno"), ("osmosis-1", "osmo")],
    );
let abstract_interchain = AbstractInterchainClient::deploy_on(&interchain);
// single-chain client
let juno_abstract: AbstractClient = abstract_interchain.client("juno-1");
}
Testnet/Mainnet Environments
Abstract maintains deployments for a few testnets and for most mainnets. Instead of re-deploying Abstract to these networks you can make use of the load_from function on AbstractInterchainClient. To do this, first construct an InterchainDaemon object with the chains you’d like to use.
#![allow(unused)]
fn main() {
let interchain = DaemonInterchain::new(vec![
        (LOCAL_JUNO, None),
        (LOCAL_OSMO, None)
    ], &ChannelCreationValidator)?;

let abstract_interchain = AbstractInterchainClient::load_from(&interchain);
// single-chain client
let juno_abstract: AbstractClient = abstract_interchain.client("juno-1");
}
Module Metadata
Module metadata is a set of information that describes a module. This information is stored on-chain and can be accessed by anyone. The metadata includes the following fields:
Modules
The following modules are offered by Abstract and can be used in your applications to add additional functionality. Before you continue, make sure to learn about what modules are.

Adapters
App Modules
Also check out Awesome Abstract to see modules that other teams may have built.
DeFi Adapters
Developers teams shouldn’t waste engineering time and capital on integrations. Most DeFi applications rely on the same common protocols, interfaces for which are often re-implemented by every new developer team.
Abstract’s DeFi adapters allow developers to write applications agnostic of the underlying DeFi primitive so that they’re portable to any new protocol, regardless of their APIs.
Adapters offered by Abstract currently include:
External Use
Our DeFi adapters are open-source and can be used by any developer team, regardless of whether they’re using Abstract’s framework. As described, our adapters facilitate interactions with a host of DeFi primitives by handling API call construction.
To enable the “external” use of this feature we expose a GenerateMessages query that returns the messages required to interact with a given DeFi primitive. This query can be used by any developer team to construct the messages required to interact with a DeFi primitive.
The query is defined as:
#![allow(unused)]
fn main() {
GenerateMessages {
    /// Execute message to generate messages for
    message: <<AdapterExecuteMsg>>,
    /// Sender Addr generate messages for
    addr_as_sender: String,
}
}
Where AdapterExecuteMsg is the Adapter’s exposed API. The query returns a list of messages (CosmosMsg) that should be executed by the addr_as_sender to interact with the DeFi primitive.
Dex Adapter Module
The Dex Adapter Module provides a unified interface to interact with various decentralized exchanges (dexes) across the Cosmos ecosystem. By abstracting the differences between various dexes, it allows developers to interact with any dex using a standard interface, streamlining the development process and ensuring compatibility across various dex platforms.
Features
- Swap: Exchange one asset for another.
- Provide Liquidity: Add assets to a liquidity pool.
- Withdraw Liquidity: Remove assets from a liquidity pool.
- Simulate Swap: Predict the outcome of a swap without executing it, useful for previewing potential trades.
- Provide Liquidity Symmetric: Add an equal value of two assets to a liquidity pool.
- Custom Swap: Execute a swap with custom parameters, allowing for more advanced trading strategies.
Note that each one of these actions supports both ANS and raw variants, meaning that you can use both human-readable and explicit asset denominations.
Supported Dexes
The following Dexes are currently supported:
- Osmosis (Osmosis)
- Astroport (Neutron, Terra, Injective, Sei)
- Kujira (Kujira)
- Astrovault (Archway)
- Wyndex (Juno)
If you would like to request support for an additional Dex, please create a GitHub issue or reach out to us on Discord.
Installation
To use the Dex Adapter Module in your Rust project, add the following dependency to your Cargo.toml:
[dependencies]
abstract-dex-adapter = { git = "https://github.com/AbstractSDK/abstract.git", tag="<latest-tag>", default-features = false }
Usage with the Abstract SDK
To interact with a dex, you first need to retrieve the dex using the Dex Adapter. Here’s a basic example in Rust:
#![allow(unused)]
fn main() {
// Retrieve the dex
use abstract_dex_adapter::api::DexInterface;
...

let dex_name = "osmosis".to_string();
let offer_asset = OfferAsset::new("juno", 1000u128);
let ask_asset = AssetEntry::new("uusd");
let max_spread = Some(Decimal::percent(1));
let belief_price = Some(Decimal::percent(2));

let dex = app.dex(deps.as_ref(), dex_name);

let swap_msg = dex.swap(offer_asset, ask_asset, max_spread, belief_price);
}
Why Use the Dex Adapter?
Simplified Development
By using the Dex Adapter, developers can bypass the intricacies of each individual dex. This means less time spent on understanding and integrating with each dex’s unique API, and more time focusing on building core functionalities.
Flexibility
The Dex Adapter ensures that your application remains flexible. If a new dex emerges or if there are changes to an existing one, your application can easily adapt without undergoing major overhauls.
Use Cases
- Rapid Prototyping: Quickly build and test applications on top of various dexes without the need for multiple integrations.
- Cross-Dex Applications: Build applications that leverage multiple dexes simultaneously, offering users more options and better rates.
- Future-Proofing: Ensure your application remains compatible with future dexes that emerge in the Cosmos ecosystem.
Documentation
- Dex Interface: For a detailed look at the dex interface, refer to the Rust trait interface.
- Adapters Documentation: Comprehensive information about adapters can be found in the official documentation.
Contributing
If you have suggestions, improvements, new dexes, or want to contribute to the project, we welcome your input on GitHub.
Lending Market Adapter Module
The Lending Market Adapter Module provides a unified interface to interact with various lending and borrowing markets (sometimes called money markets) across the Cosmos ecosystem. By abstracting the differences between various lending markets, it allows developers to interact with any lending market using a standard interface, streamlining the development process and ensuring compatibility across various lending platforms.
Features
- Deposit: Deposit funds for lending
- Withdraw: Withdraw lent funds.
- Provide Collateral: Deposit collateral to borrow against
- Withdraw Collateral: Withdraw collateral to borrow against
- Borrow: Borrow funds from the lending market
- Repay: Repay funds to the lending market
Note that each one of these actions supports both ANS and raw variants, meaning that you can use both human-readable and explicit asset denominations.
Supported Lending Markets
The following lending markets are currently supported:
- Mars (Osmosis, Neutron)
- Kujira Ghost (Kujira)
If you would like to request support for an additional lending market, please create a GitHub issue or reach out to us on Discord.
Installation
To use the Lending Market Adapter Module in your Rust project, add the following dependency to your Cargo.toml:
[dependencies]
abstract-money-market-adapter = { git = "https://github.com/AbstractSDK/abstract.git", tag="<latest-tag>", default-features = false }
Usage with the Abstract SDK
To interact with a lending market, you first need to retrieve the lending market using the Moneymarket Api. Here’s a basic example in Rust:
#![allow(unused)]
fn main() {
// Retrieve the money_market
use abstract_money_market_adapter::api::MoneyMarketInterface;
...

let money_market_name = "mars".to_string();
let deposit_asset = Asset::native("ujuno", 12345u128);

// Using the raw (non ANS-enabled) lending market
let money_market = app.money_market(deps.as_ref(), money_market_name);
let deposit_msg = money_market.deposit(deposit_asset);
}
Limitation
The Lending Market adapter provides easy ways of interacting with lending markets. However, some errors can appear without the adapter catching them:
- The lending market can have deposit limits enabled which may be crossed when using this adapter.
- The lending market may not have liquidity available to borrow funds.
- The lending market may not have liquidity available to withdraw deposited funds from
- The user may not be able to withdraw collateral because they are borrowing too many funds.
All those errors and more have to be handled directly by the developers integrating this adapter.
Why Use the Lending Market Adapter?
Simplified Development
By using the Adapter, developers can bypass the intricacies of each individual platform. This means less time spent on understanding and integrating with each lending market’s unique API, and more time focusing on building core functionalities.
Flexibility
The Lending Market Adapter ensures that your application remains flexible. If a new lending market emerges or if there are changes to an existing one, your application can easily adapt without undergoing major overhauls.
Use Cases
- Rapid Prototyping: Quickly build and test applications on top of various lending markets without the need for multiple integrations.
- Cross-Dex Applications: Build applications that leverage multiple lending markets simultaneously, offering users more options and better rates.
- Future-Proofing: Ensure your application remains compatible with future lending markets that emerge in the Cosmos ecosystem.
Documentation
-
Lending Market Interface: For a detailed look at the lending market interface, refer to the Rust trait interface. #TODO, fix this will be broken
-
Adapters Documentation: Comprehensive information about adapters can be found in the official documentation.
Contributing
If you have suggestions, improvements, new lending markets, or want to contribute to the project, we welcome your input on GitHub.
CosmWasm Staking
An Abstract Adapter module that handles staking and unbonding interactions with LP staking providers.
Naming Convention
In order to easily identify and relate contracts to on-chain addresses we follow the following conventions:
- Staking AssetEntry: an
AssetEntryof the token that is stakeable. For LP tokens this is formatted as{provider}/{asset_pair}.- Ex:
osmosis/cosmoshub>atom,juno>juno
- Ex:
- Staking AddressEntry: a
ContractEntrythat is formatted as {provider}:staking/{staking_asset_entry}- Ex:
osmosis:staking/osmosis/cosmoshub>atom,juno>juno
- Ex:
CosmWasm Staking Adapter Module
The CosmWasm Staking Adapter Module provides a unified interface to interact with various protocols offering staking services to token holders. This can go from LP-staking to governance token locking. By abstracting the differences between various staking protocols, it allows developers to interact with any LP staking protocol using a standard interface, streamlining the development process and ensuring compatibility across various staking platforms.
Features
- Stake: Deposit (and lock) assets inside a staking protocol
- Unstake: Remove (and unlock) assets from staking protocol. In protocols with a locking period after unstaking, this simply triggers the unbonding process
- Claim Rewards: Claims the rewards associated with locking your assets. In protocols with a locking period on rewad claim, this simply triggers the unbonding process
- Claim: Claim matured unbonding claims (from unstake of Claim rewards)
Supported Staking Providers
The following Staking Providers are currently supported:
- Osmosis (Osmosis)
- Astroport (Neutron, Terra, Injective, Sei)
- Kujira (Kujira)
- Astrovault (Archway)
- Wyndex (Juno)
If you would like to request support for an additional Staking Provider, please create a GitHub issue or reach out to us on Discord.
Installation
To use the CW-Staking Adapter Module in your Rust project, add the following dependency to your Cargo.toml:
[dependencies]
abstract-cw-staking = { git = "https://github.com/AbstractSDK/abstract.git", tag="<latest-tag>", default-features = false }
Usage with the Abstract SDK
#![allow(unused)]
fn main() {
// Retrieve the adapter interface
use abstract_sdk::{AdapterInterface, core::objects::LpToken};
use abstract_cw_staking::{msg::StakingAction, msg::StakingExecuteMsg, CW_STAKING};
...

let provider = "osmosis".to_string();
let lp_asset = LpToken::new(provider, vec!["cosmoshub>atom".into(), "juno>juno".into()]));

let adapters = app.adapters(deps);

let stake_msg = adapters.request(
    CW_STAKING,
    StakingExecuteMsg {
        provider,
        action: StakingAction::Stake {
            assets: vec![AnsEntryConvertor::new(lp_asset).ans_asset()],
            unbonding_period: None,
        },
    },
)
}
Why Use the Cw Staking Adapter?
Simplified Development
By using the Cw Staking Adapter, developers can bypass the intricacies of each individual Staking Provider. This means less time spent on understanding and integrating with each staking provider’s unique API, and more time focusing on building core functionalities.
Flexibility
Using Abstract adapters ensure that your application remains flexible. If a new Staking Provider or use-case emerges or if there are changes to an existing one, your application can easily adapt without undergoing major overhauls.
Use Cases
- Rapid Prototyping: Quickly build and test applications on top of various staking providers without the need for multiple integrations.
- Cross-Dex Applications: Build applications that leverage multiple staking providers simultaneously, offering users more options and better rates.
- Future-Proofing: Ensure your application remains compatible with future staking solutions that emerge in the Cosmos ecosystem.
Documentation
- CW-Staking Interface: For a detailed look at the cw-staking interface, refer to the Rust trait interface.
- Adapters Documentation: Comprehensive information about adapters can be found in the official documentation.
Contributing
If you have suggestions, improvements, new Staking Providers, or want to contribute to the project, we welcome your input on GitHub.
Subscription App
Description
This app allows users to create subscriptions that other people can subscribe to. Users provide funds when they subscribe and those funds are used to pay for the subscription for as long as the funds don’t run out.
When a user does’n top-up their balance, an external call is made to the subscription contract to cancel the subscription. The admin can opt to add a cancellation hook that will be called when the subscription is canceled and which contains the addresses of the now ex-subscribers.
Features
The subscription app serves three primary functions:
- Empower businesses to unlock revenue streams with a cutting-edge subscription model.
- Streamline the allocation of earnings and native assets to your team of contributors, ensuring fair compensation.
- Enhance user engagement by rewarding active participants with native assets, fostering a vibrant community ecosystem.
Income
The income generated by our service can fluctuate as new subscribers join and existing ones depart. To ensure our system adapts to these changes in revenue, we’ve developed a method to monitor income closely. Traditional monthly settlements aren’t compatible with blockchain technology, so we’ve adopted a monthly payment approach instead. We calculate a ‘Time-Weighted Average’ of income, breaking it down to a per-second basis to get a clear picture of our earnings throughout the month. This process helps us average out the income over each month, allowing us to make informed decisions and adjustments to our infrastructure based on current financial performance.
Emissions
Protocol emissions play a crucial role in building a close-knit community of users and contributors for your product. The emissions functionality of this module makes it simple to tailor emission settings to suit your requirements. You set these parameters at the time you create the module, and they’re detailed within the ‘EmissionType’ structure, ensuring you have the flexibility to adjust how rewards are distributed within your community.
Contributions
The contribution feature in our contract is designed to directly reward users who help develop and enhance your product. Every contributor is recognized with specific ‘Compensation’ settings tailored to them. Here’s how it works:
- The system’s total revenue is distributed between the organization (DAO) and its contributors, as outlined in the ‘ContributionConfig.’
- Optionally, token emissions to contributor (and users) are dynamically set based on the protocol’s income. This means if the demand or income decreases, token distributions increase, and they decrease when demand or income goes up.
This approach ensures that those who invest their time and effort into the product are fairly compensated, fostering a motivated community committed to the product’s growth.
Documentation
- App Documentation: Comprehensive information about adapters can be found in the official documentation.
Contributing
If you have suggestions, improvements or want to contribute to the project, we welcome your input on GitHub.
Community
Check out the following places for support, discussions & feedback:
- Join our Discord server
XION
XION is consumer-oriented chain focused on eliminating the complexities of Web3 interaction through “generalized abstraction,” offering users the ability to interact with apps and liquidity on any chain.
XION uses Abstract’s ICAAs to enable chain abstraction and for full control and programmability of any chain over IBC.
Mint an NFT on Neutron directly from XION here! This demonstration walks you through each step of the process, though all actions can be fully abstracted away in practice.
Statistics
As of July 15th, 2024, XION has:
- 160K+ Abstract Accounts
- 150K+ Interchain Abstract Accounts on Neutron
- 400K+ Transactions, 300K of which were cross-chain
Articles
Equilibrium Rebalancer
Equilibrium, 1st place winner of HackWasm 2022, is a rebalancing protocol for DeFi portfolios. It allows users to create weighted baskets of assets and supports rebalancing of the portfolio using liquidity on any Dex in the interchain ecosystem, local or remote.
Modules
- Dex Adapter
- ETF: tokenizes the account and allows users to buy and sell shares
- Balancer: handles basket weights and rebalancing logic
Architecture
flowchart LR
	subgraph App[Equilibrium]
		direction LR
		M[Balancer] -.-> |swaps|Dex
		M -.-> |updates shares|ETF
		Dex[/Dex/] --> AA["Abstract Account"]
		M --> AA
		ETF -- tokenizes --- AA
		end

	User[fa:fa-user User] -.-> |rebalance|App
	User -.-> |deposit|App
	User -.-> |withdraw|App
	User -.-> |update_weights|App
Read more on equilbrium on its official website.
FortyTwo Autocompounder
FortyTwo, winner of the Cosmoverse 2023 pitch contest, aims to simplify access to the Cosmos ecosystem, acting as an entry point and yield aggregator for all IBC-enabled chains. It provides a unified user interface for yield farming, liquidity optimization, and portfolio tracking.
FortyTwo built a dex-agnostic autocompounder application on Abstract, allowing for autocompounding any LP position in the interchain ecosystem.
Modules
Architecture
flowchart LR
	subgraph App[FortyTwo Autocompounder]
		direction LR
		Auto[Autocompounder]-.-> |swaps|Dex
		Auto -.-> |stakes|Staking
		Dex[/Dex/] --> AA["Abstract Account"]
		Auto --> AA
		Staking[/Staking/]  --> AA
		end

	User[fa:fa-user User] -.-> |compound|App
	User -.-> |deposit|App
	User -.-> |withdraw|App
For more details about FortyTwo, please visit their official website.
Carrot Savings
Carrot Savings is an interchain stablecoin yield aggregator and optimizer, designed to give users the best stablecoin yields using DeFi protocols.
Carrot Savings is live! Deposit and withdraw USDC and get over 20% yield (as of July 15, 2024).
Modules
- Dex Adapter
- Lending Market Adapter
- Savings: stablecoin position management
Architecture
flowchart LR
	subgraph App[Carrot Savings]
		direction LR
		B[Savings] -.-> |provide_liquidity|Dex[/Dex/]
		B -.-> |lend / repay|Lending[/Lending/]
		Dex --> AA["Abstract Account"]
		B --> AA
		Lending --> AA
		end

	User[fa:fa-user User] -.-> |deposit|App
	User -.-> |withdraw|App
	Cron -.-> |autocompound|App
Frequently Asked Questions (FAQ)
- What is Abstract?
Abstract is a CosmWasm development platform designed to empower developers to craft secure and dynamic applications effortlessly. It boasts a modular architecture and provides an exhaustive range of tools, streamlining the development process and catalyzing the innovation of solutions in the blockchain space.
- Who can use Abstract?
There are a few faces to Abstract:
- For users to interact with applications, accounts, and liquidity on any chain via Abstract Accounts.
- For developers and protocols looking to build composable and scalable CosmWasm applications quickly using the Abstract SDK
- For chains looking to offer their users interoperability with other chains and protocols. See chain abstraction.
- How does Abstract differ from other platforms?
Abstract was built from the ground up by developers, for developers. We started Abstract to allow developers to collaborate in bringing their applications to reality in an efficient and scalable manner. Ultimately, Abstract will be fully vertically integrated, meaning that we’ll control the entire application stack, ranging from the smart-contracts, testing tooling, on-chain infrastructure, off-chain infrastructure, accounts, and ultimately the users.
- How can I get started with Abstract?
To get started with Abstract, check out getting started! You will find comprehensive guides, tutorials, and resources to help you understand the platform’s features and functionality. Additionally, you can join our developer community on Discord to connect with like-minded developers and seek assistance if needed.
- Can I contribute to the Abstract ecosystem?
Absolutely! Abstract values community contributions and welcomes developers to contribute to the growth of CosmWasm. The best ways for you to contribute are by creating modules (see the getting started docs), sharing your insights and knowledge, participating in discussions, and collaborating on some of our open-source projects. Check out the Contributing page to learn more about how you can get involved.
- What are the costs associated with using Abstract?
Abstract’s SDKs are free to use, though we offer paid plans for chains wishing to offer the more advanced capabilites of our platform, such as account abstraction or chain abstraction. Please contact us if you’re a chain or protocol looking to offer these capabilities to your users.
- How does Abstract ensure the security of financial applications?
The marketplace on which all modules are registered and installed requires that each module be audited and conform to our security standards. Additionally, the modular architecture allows developers to leverage pre-built functionalities and best practices, reducing the risk of vulnerabilities. We are partnering with Oak Security to ensure every module is up to spec.
- How can I stay updated with Abstract’s latest developments?
Follow us on X @AbstractSDK to stay in the loop with our latest advancements!
- What about cw-orchestrator?
cw-orchestrator is the most advanced CosmWasm scripting, testing, and deployment tool designed to simplify interactions with CosmWasm smart contracts. By providing a set of macros that generate type-safe interfaces for your contracts, it not only enhances the code’s readability and maintainability but also reduces testing and deployment overhead. Check it out!
- Why doesn’t Abstract have a chain?
In short, every chain supporting Abstract is an Abstract chain.
Remaining chain-agostic means that we can focus on delivering advanced infrastructure and applications for every new chain as blockchain technology improves. We seek to collaborate with teams delivering the best technology for users in the ever-changing Web3 landscape.
- Why did Abstract start in Cosmos?
In short, interoperability. Cosmos pioneered the appchain thesis, pushing applicaitons to have their own chains so that they can scale effectively and capture as much value as possible. To make this possible, Cosmos deveolped IBC to ensure these applications were accessible from other chains. IBC is fully trustless and is winning as the most widely used bridging protocol. Interoperability is the only way that Web3 is going to achieve mass-adoption, and Abstract aims to make this happen as quickly as possible.
And by the way - IBC is coming to EVM, this year. This means that the total addressable market for Abstract is going to increase by over 3 orders of magnitude. Think about it.
- Why is Abstract built in CosmWasm?
CosmWasm is highly efficient, offers the most comprehensive smart-contract capabilities, type- and memory-safe (because it’s Rust), and has a focus on interoperability with its native IBC integration. This makes it the absolute best choice for building scalable cross-chain applications.
- Where can I seek support if I face issues?
The Abstract community is active and welcoming. If you’re encountering issues or have questions, you can join our developer community on Discord or browse the platform’s documentation for detailed guides and answers.
Abstract In 5 Minutes
Adair
A pitch of the Abstract Money CosmWasm application framework. A quick overview of the advanced features of the developer components and their relevance in an interchain ecosystem.
An Overview of the Abstract Platform - You Don’t Need To Know
Howard
Explore the transformative potential of abstraction, focusing on account and chain abstraction within the Web3 and Cosmos ecosystems. We’ll delve into how these concepts simplify blockchain interactions and enhance interoperability, while also touching on the importance of Web2 powered auth systems in bridging the authentication gap.
Abstract SDK - Quadratic Funding Demo
Adair
Cw-Orchestrator - The Best Developer Tooling in Cosmos
Kayanski
Why and How to Build on Abstract
Howard
Learn about the different components of Abstract and what it means to build applications on a chain-agnostic framework.
When All You Have is Cosmos, Everything Looks Like a Chain - The Fat Interface Thesis
Adair
An overview of the migration from the Fat Protocol Thesis to the Fat Application Thesis, and finally the Fat Interface Thesis (same as FPT). Identifies the key components in realizing true interchain applications without the users being aware of the technology behind them.
Releases
Release notes for the official Abstract SDK releases. Each release note will tell you what’s new in each version, and will also describe any backwards-incompatible changes made in that version.
Active Stable Version: v0.23.0
All releases:
- 0.24.0 - Unreleased
- 0.23.0 - Stable
- 0.22.1
- 0.21.0
- 0.20.0
- 0.19.0
- 0.17.2
- 0.17.1
- 0.17.0
- 0.7.0
- 0.7.0
- 0.5.2
- 0.5.0
- 0.5.0
v0.x.x
[Unreleased] - yyyy-mm-dd
Added
- Added migration function to migrate from xion accounts
- Added
PfmMemoBuilderAPI for building middleware forwarding memo - Added
HookMemoBuilderAPI for building wasm ibc hook memo execute_with_fundsto Executor to attach funds to execution.stargatefeature for abstract-app, abstract-standalone and abstract-adapter packages.- New module type:
Service, behaves the same as Native, but can be registered by any namespace. AbstractClient:serviceto get api of Service moduleCustomExecuteHandlerTo improve support for fully custom execute messages on Apps or Adaptersbalancemethod forAnsHostto query balance ofAssetEntryAbstractInterchainClientto simplify Abstract deployments across multiple chains
Changed
- **Merged
proxyandmanagercontracts intoaccount. - Deployments now use pre-determined addresses. These addresses are hardcoded in the contracts.
- Ibc related renaming to add more consistency in namings
- Account action on executor takes
impl IntoIter<Item = impl Into<AccountAction>>instead ofVec<AccountAction> - Native contracts now have pre-compiled addresses. This removes the need for storing addresses in an on-chain state.
- Removed
UpdateConfigendpoints from most native contracts andApp/Nativebases. - Minified the storage namespaces and made them available via constants
- Version Control renamed to registry
registry::QueryMsg::Accountwas changed toregistry::QueryMsg::Accountsfor simultaneous queries- Added
registry::QueryMsg::AccountListfor paginated account queries - Simplified the implementations of KeyDeserialize, PrimaryKey and Prefixer traits for
AssetEntry,DexAssetPairing,ModuleInfo,ModuleVersion. Used the base tuple implementation instead - Removed
install_on_sub_accountfor client, replaced with explicit sub_account creation
Abstract Client
with_modulesmethod for Account Builder to add list of modules to install (ModuleInstallConfig)query_modulemethod for Account to query given module on account without retrievingApplicationobjectmodule_installedmethod for Account that returnstrueif module installed on accountmodule_version_installedmethod for Account that returnstrueif module of this version installed on accountaddressmethod for Account to get address of account. Result of this method is the same as callingproxyenable_ibcadded to Account builder.module_statuson AbstractClient that returns current status of the module.install_on_sub_accountnow defaults tofalsein Account BuilderPublisherwill check if dependencies of the module is registered in version control to the chain before publishing.
Removed
- Receive endpoints from abstract Modules
- Value calculation logic from proxy contract.
cw-semverdependency removed- Manager no longer able to migrate pre
0.19abstract adapters - Account Factory contract
- Unused
DepositManagerandPagedMapobjects from abstract-std
Fixed
- Abstract Client: If Account Builder retrieves account now it will install missing modules from the builder instead of ignoring them
[0.23.0] - 2024-07-16
Added
- Abstract Client: Added a
claim_namespacefunction to facilitate claiming a namespace after account creation - Version Control interface:
approve_all_modules_for_namespaceto approve any pending modules by given “namespace” - IBC module to module queries and API.
- Abstract Interface: Added helpers to create abstract IBC connections (with open-sourced cw-orch-interchain)
- Ability to send multiple query messages through IBC simultaneously
- New module type
abstract-standalonefor standalone contracts. - Abstract Client: added
execute_on_managerhelper method - Abstract Client: Exposed
IbcClientobject underAbstractClient::ibc_client() - Abstract Client(feature “interchain”):
connect_toto create abstract IBC connections - Abstract Client(feature “interchain”):
RemoteApplicationandRemoteAccountobjects that replicateApplicationandAccountfunctionality in interchain environment - Abstract Account: Added an
upgradehelper to upgrade an account step by step (going through all necessary versions) - IBC Client: Apps and Adapters checks that IBC Client is dependency of the module inside ibc_callback and module_ibc handlers
- Ibc Client: Module to module actions now checks if app have ibc_client installed to ensure account can receive ibc callback
- Helpers to simply connecting Abstract instances through IBC and reduce the setup boilerplate
register_in_version_controladded to theabstract_interface::Abstractfor registering new versions of native contracts in Version Control- Registration migrated native contracts to Version Control in
abstract_interface::Abstract::migrate_if_version_changedmethod - New governance type
NFTwhich allows an account to be owned by an NFT.
Changed
- Manager will try to check dependencies on standalone modules.
- Accounts with local sequence 2147483648..u32::MAX are allowed to be claimed in any order
- IBC Callback and IBC module to module endpoints now have decomposed variables (sender, msg and callback)
- IBC Callback messages are now mandatory and renamed to
callback - Removed IBC callback IDs
- Renamed
CallbackInfotoCallback - Ibc API: Where applicable - accept
ChainNameinstead ofStringto add clarity for the user - Standalones and IBC Client no longer added to proxy whitelist
- IBC client and host now migrated only if version is not breaking and deployed otherwise
cw-ownablegot replaced withcw-gov-ownablefor manager contract- Renamed
ChainNametoTruncatedChainId - IBC Client:
send_fundsaccepts optionalmemofield for every Coin attached - Bump cw-orch to
0.24.0
Removed
- Accounts with local sequence 0..2147483648 cannot be predicted
- Ibc Callback handler no longer includes
MessageInfoas sender is always ibc_client and funds are empty - Account Factory no longer stores ibc-host, instead it queries VersionControl to assert caller matches stored to the one in version control
governance_detailsfrommanager::AccountInfo- Removed
update_factory_binary_msgsendpoint from module factory - Removed
propose_ownershipmethod on manager, everything done throughupdate_ownershipinstead
Fixed
- Abstract Client: Fixed contract address collision for same apps that are on different accounts
- abstract_interface deploy methods: Fixed a bug where it was not possible to propose uploaded contract(saved in cw-orch state)
- abstract_interface deploy methods: Checks both registered and pending modules instead of only registered
[0.22.1] - 2024-05-08
Added
state.jsonnow included in binary in release mode, allowing using binaries on a different environment than it’s been built.module_instantiate2_address_rawforAbstractClient, allowing to install a different version than the dependency version.- Added helper functions
assert_registeredandis_registeredto the ANS client API. - Added method
module_infofor querying and verifying wether an address is a module to the ModuleRegistry API. - Added default IBC-Client installation on remote modules inside Client and Account interfaces
- Send multiple message simultaneously through IBC
Changed
- Renamed
account_idtoexpected_account_idforabstract_client::AccountBuilderfor clarity - Namespace claiming on mainnet is now permissioned.
- Renamed
version_control::Config::allow_direct_module_registration_and_updatesfield tosecurity_disabled. - Renamed
requesttoexecutein adapter and apps APIs - Updated to cw-orch 0.22 and cw-orch-core stabilization to 1.0.0
Removed
- unused
custom_swapofDexCommand - Send multiple messages to multiple IBC connected chains in one manager message.
interfacefeature from all of the packages
Fixed
[0.21.0] - 2024-02-20
Added
- Added a
.executemethod on the AuthZ API to executeCosmosMsgtypes on behalf of a granter. - Add IBC helpers to account client.
- Abstract Client builder: register dexes on ANS
.sub_accountsmethod onAccountfor getting Abstract Client Sub Accounts- Publish adapter method of Abstract Client Publisher now returns Adapter object
- Added a
.account_frommethod on theAbstractClientfor retrievingAccounts. - Creating Sub Account from
AbstractClientAccount builder. - Installing apps and adapters for
AbstractClientAccount builder - Attaching funds to account creation on
AbstractClientAccount builder - Added
unchecked_account_idmethod on version control. - Ability to provide expected local AccountId
- Reinstallation of the same version of an app is now disabled
.authorize_on_adaptersmethod onApplicationfor authorizing application on adapters- Added method to assign expected
.account_idfor Abstract Client Account builder .next_local_account_idforAbstractClientto query next local account sequence.module_instantiate2_addressforAbstractClientto get predicted address
Changed
- Updated UsageFee api to use
Address, instead ofApi+ unchecked address - Tests now use
MockBech32due to use of instantiate2.
Removed
Fixed
- Added a validation on
account_idmethod on version control. - Creating sub-account from account factory is restricted. Use Create Sub Account method of the manager instead
[0.20.0] - 2024-01-24
Added
AppDeployerandAdapterDeployernow take aDeployStrategyfield.Astrovaultintegrated into dex and cw-staking adaptersAuthZAPI added- Interchain Abstract Accounts can now be created!
- Added snapshot tests
- Method
query_account_owner()for Apps Admin object - Query
registered_dexesforAbstractNameServiceClient - Query
top_level_ownerfor manager and apps(as base query) - Support of
ConcentratedLiquiditypool type for swaps. Stake/unstake currently not supported - Account namespace is unclaimed after
Renounce - Resolve trait for
cw-orchAnsHostinterface
Changed
is_module_installedmoved fromManagertoAccount.account_id()method ofAccountRegistryis now exposed.- Allow module-id to be passed in as a valid authorized address when allowing new addresses on adapter contracts.
BaseInstantiateMsgis now removed from install app API, now onlyModuleMsgshould be provided.Modules,ManagerandProxyare now instantiated via instantiate2 message.FeeGrantAPI updated.- Bump
cw-orchtov0.18. - Top level account owner now has admin privileges on the apps and adapters
- Multiple
AbstractAccounts now don’t overlap - Top level account owner can now claim pending sub-accounts directly
Clearablehelper type was added to the messages where clearing optional state could be useful- Only incremental version migration of modules allowed (0.10 -> 0.11 is allowed but 0.10 -> 0.12 not because it skips 0.11)
- Module
tag_responseandcustom_tag_responseno longer requireResponseas an argument as well as renamed toresponseandcustom_responserespectively. - Having sub accounts will prevent you from
Renounce - Version Control
Namespacequery now doesn’t return an error when namespace is unclaimed NamespaceResponsetype updated to be able to represent claimed and unclaimed namespace
Removed
DepositMsgsremoved (nowdeposit()returnsVec<CosmosMsg>)- Abstract removed from the fields where it’s redundant
- InstantiateMsg is now removed from the install_adapter API
- Removed
wasm_smart_queryhelper, since it’s accessible fromQuerierobject - Removed Adapter base
Removeaction
Fixed
- Namespace registration fee fixed
- Version Control smart query now returns Version Control config instead of factory address
- Sub accounts now unregister themselves on owning manager if renounced
[0.19.0] - 2023-09-26
Added
- Install modules on account or Sub-account creation.
- Manager stores his sub-accounts and sub-accounts can register or unregister in case of ownership change.
- Query on module factory to see how much funds needs to be attached for installing modules.
- Version control on instantiation to the Apps alongside with registry traits.
- Instantiation funds added to module configuration, allowing modules to perform external setup calls.
- An
adapter_msg_typessimilar toapp_msg_types. This can be used to easily define the top-level entrypoint messages.
Changed
- Updated fetch_data arguments of CwStakingCommand
- StakingInfoResponse now returns staking target(which is either contract address or pool id) instead of always staking contract address.
- Owner of the sub-accounts now Proxy, allowing modules to interact with sub-accounts.
- Install modules replaced install module method on module factory to reduce gas consumption for multi-install cases.
- Modified the account id structure. Each account is now identified with a unique ID and a trace. This is a requirement for Abstract IBC.
- Register Module(and Add Module) will now accept list of items, which reduces gas for multi-module install
- Removed the
CustomSwapoption on the dex adapter. - Stake methods on cw-staking adapter now accept list, allowing users to do multi-stake/unstake/etc.
- Added must_use attribute on abstract sdk methods
- Renamed
abstract-(dex/staking)-adapter-traitstoabstract-(dex/staking)-standard
Fixed
- Partially fixed cw-staking for Osmosis.
- Manager governance now changes only after new “owner” claimed ownership.
- Fixed and separated cw-staking and dex adapters for kujira.
ExecOnModulecalls now forward any provided funds to the module that is called.- Manager queries of standalone module versions will now return version of the contract from the Version Control storage instead of error
[0.17.2] - 2023-07-27
Added
- Neutron + Archway to registry
Changed
Fixed
[0.17.1] - 2023-07-26
Added
- Ability to set admin to native contracts during instantiation
- Query handler for module data
- Added neutron
Changed
- Address of App/Adapter returned and set by default.
Fixed
[0.17.0] - 2023-07-05
Added
- Ability to add module metadata.
- Ability to set an install fee for modules.
- Account interaction helpers
Changed
- Removed the ability to claim multiple namespaces.
- It is now possible to replace a module code-id/address on testnets.
Fixed
- Adapter execution from the manager with a provided proxy address is now allowed.
[0.7.0] - 2023-02-15
Added
Changed
- Errors now need to implement
From<AbstractError>andFrom<AbstractSdkError>
Fixed
[0.7.0] - 2023-02-01
Added
Changed
- Version Control
Modules/ModuleList
Fixed
[0.5.2] - 2023-01-10
Added
Changed
Fixed
- Fixed abstract-interface publishing
[0.5.0] - 2022-01-08
Added
Changed
Fixed
- Fixed wasming with
write_apierror in theabstract-adapterandabstract-app
[0.5.0] - 2022-01-08
Added
Module Factory
- unit testing
Ans Host
Configquery
Abstract SDK
- Better querying of app and adapter directly vs message construction
Changed
PoolIdis now renamed toPoolAddressto avoid confusion with the Abstract Pool Id (and because it can be resolved to an address / id)
Removed
construct_staking_entryfromContractEntry, which had previously violated the SRP.
Fixed
Abstract Glossary
These are some definitions used in our documentation:
Abstract
A framework designed to simplify the development of decentralized applications in the Cosmos ecosystem. It offers tools and infrastructure for composable smart-contract applications.
Abstract Account
A unique entity within the Abstract framework that can have modules installed onto it, enabling various functionalities.
Account
Short for Abstract Account.
Abstract Account Console
A web-based interface that provides functionalities like account management, module management, name service, dev tools, and delegations.
Abstract APIs
Interfaces provided by Abstract to facilitate interactions between the frontend and the on-chain framework.
Abstract Base
The foundational layer of the Abstract framework, upon which other functionalities and modules are built.
Abstract Modules
Pre-built functionalities that can be installed onto an Abstract Account. They come in three types: App, Adapter, and Standalone.
Abstract Name Service (ANS)
An on-chain store that provides chain-agnostic action execution and dynamic address resolution.
Abstract SDK
A toolbox for developers to create composable smart-contract APIs in the Abstract ecosystem. It provides a set of tools and utilities to facilitate the creation and interaction of smart contracts.
Abstract-Testing
A package that provides testing utilities for CosmWasm contracts, focusing on mocking and querying functionalities.
Abstract.js
A JavaScript library designed to facilitate interactions with the on-chain Abstract framework.
Account Abstraction
A concept where the Abstract Account acts as a layer abstracting the complexities of blockchain interactions, allowing for a more user-friendly experience.
Account Ownership
The concept that defines who has control and access rights over an Abstract Account. This can be a single entity ( Monarchy) or multiple entities (Multisig).
Adapter
A type of Abstract Module that acts as an intermediary, translating and routing messages between Apps and external services or protocols.
API Objects
Rust structs in the Abstract SDK that expose specific smart-contract functionalities. They can be used if a contract implements the required features/api traits.
App
A type of Abstract Module designed to enable specific features or transform Abstract Accounts into standalone products.
Cosmos
A decentralized network of independent, scalable, and interoperable blockchains. The Cosmos ecosystem is built on a set of modular, adaptable, and interchangeable tools, with the Cosmos SDK being its foundational framework. Cosmos aims to create an “Internet of Blockchains” where different blockchains can communicate and transact with each other seamlessly through the Inter-Blockchain Communication (IBC) protocol.
CosmWasm
A smart contract platform built for the Cosmos ecosystem. Within the Abstract framework, CosmWasm serves as the underlying smart contract platform that powers the modular and composable functionalities of Abstract Modules. It allows developers to write secure and interoperable smart contracts in Rust, which can then be integrated into the Abstract ecosystem. By leveraging CosmWasm, Abstract ensures that its modules and applications are both scalable and compatible with the broader Cosmos ecosystem.
CW-Orchestrator
CW-Orchestrator is a scripting tool specifically designed to streamline interactions with, testing and deployment of CosmWasm smart contracts.
IBC-Host
A module that facilitates Inter-Blockchain Communication (IBC) within the Abstract framework, allowing for cross-chain interactions.
Integration Testing
Testing that involves deploying the contract and its dependencies to a mock environment to ensure they work together correctly.
JSON Schema Linking
Linking a module’s JSON schema to the Abstract Registry to improve user experience for developers using the module.
Migration Update
A process within the Abstract framework that allows for the updating or upgrading of modules without compromising the state or data.
Mock Querier
A tool provided by the abstract-testing package to mock Smart and Raw queries for unit testing.
Module Factory
A contract that allows the installation and management of Abstract Modules via the Account.
Module Installation
The process of adding a module to an Abstract Account, specifying its parameters, and initializing it on a specific network.
Module Uploading
The process of compiling a module as a WASM binary and then uploading it to the desired network(s).
Monarchy
A type of account ownership where a single entity has full control over an account.
Move Update
A process that allows for the migration of an Abstract Account from one blockchain to another within the Cosmos ecosystem.
Multisig
A type of account ownership where multiple entities have control over an account, and a predefined number of them must agree on actions taken.
Namespace
A unique publishing domain for Abstract modules, associated with an Abstract Account. It’s used to uniquely identify and monetize modules.
Raw Queries
Simple database key-value lookups without the computational aspect of smart queries.
Rust
A systems programming language that focuses on performance, reliability, and productivity. Rust offers memory safety guarantees by using a borrow checker to validate references. It’s known for its “zero-cost abstractions,” meaning developers can write high-level code without sacrificing performance. Rust has gained popularity for blockchain and smart contract development due to its safety features and efficient performance.
Smart Queries
Queries that contain a message in their request and often involve computation on the queried contract.
Registry
A contract that acts as a registry for all modules and accounts within the Abstract platform.
Contributing to Abstract SDK
Thank you for considering to contribute to the Abstract SDK project! We appreciate your support and welcome contributions to help improve this multi-environment CosmWasm smart-contract scripting library. This document provides guidelines and instructions on how to contribute to the project effectively.
Table of Contents
Getting Started
To get started with contributing to the Abstract SDK project, you should first familiarize yourself with the repository structure and the codebase. Please read the project’s README to understand the purpose, features, and usage of the Abstract SDK library as well as its documentation.
How to Contribute
There are multiple ways to contribute to the Abstract SDK project, including reporting bugs, suggesting enhancements, and submitting code contributions.
Reporting Bugs
If you encounter any bugs or issues while using the Abstract SDK library, please report them by creating a new issue in the issue tracker. When reporting a bug, please provide the following information:
- A clear and descriptive title
- A detailed description of the issue, including steps to reproduce it
- Any relevant logs, error messages, or screenshots
- Information about your environment, such as the OS, software versions, and hardware specifications
Suggesting Enhancements
We welcome suggestions for new features or improvements to the existing functionality of the Abstract SDK library. To suggest an enhancement, create a new issue in the issue tracker with the following information:
- A clear and descriptive title
- A detailed explanation of the proposed enhancement, including its benefits and potential use cases
- If applicable, any examples or mockups of the proposed feature
Code Contributions
To contribute code to the Abstract SDK project, please follow these steps:
- Fork the repository to your own GitHub account.
- Clone your fork to your local machine.
- Create a new branch for your changes using the
git checkout -b feature/your-feature-namecommand. - Make your changes and commit them with a clear and concise commit message.
- Push your branch to your fork on GitHub.
- Create a new pull request against the main branch of the Abstract SDK repository.
Pull Requests
When submitting a pull request, please make sure that your code follows the Style Guide and that all tests pass. Please provide a detailed description of your changes, including the motivation for the changes and any potential impact on the project. This will help maintainers review your pull request more effectively.
Style Guide
The Abstract SDK project follows the Rust coding style and conventions. Please ensure that your code adheres to these guidelines to maintain consistency and readability throughout the codebase.
- Use proper indentation (4 spaces) and consistent formatting (
cargo fmt). - Write descriptive variable and function names.
- Use comments to explain complex or non-obvious code.
- Follow the Rust API Guidelines for API design.
- Add documentation for public functions, types, and modules.
- Write doc tests for public functions and methods.
Community
To join the Abstract SDK community, please join the
Abstract Discord server and
the #Abstract SDK channel. You can also follow the project on
X and GitHub.
Contact Abstract
We’d love to hear from you! If you’re a chain or application looking to integrate Abstract, please schedule a call with us.
If you’re a user and looking to provide feedback or feature requests, please join our Discord or DM us on X.